


Welcome to SSL Manager‘s official documentation and interface reference document. If you haven’t installed SSL Manager yet, please refer to our installation guide.
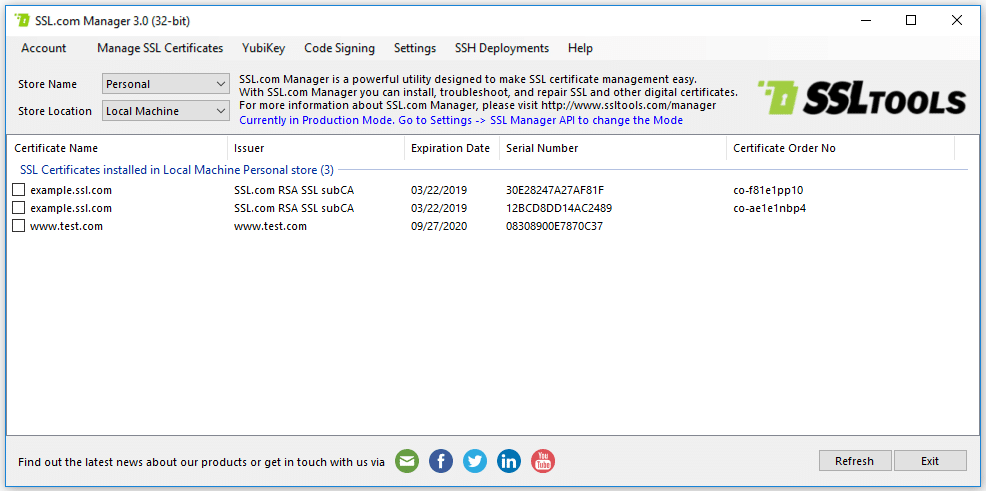
When the SSL Manager application is executed, it presents a single window. To interact with SSL Manager, you may either use the drop-down menu interface, or right-click on the window to bring up a context menu.
The Table of Contents below provides links to sections covering SSL Manager’s five drop-down menus, context-menu, and wizards, plus an appendix covering common errors and troubleshooting information:
1. Account Menu
Account menu allows users to sign-in, manage and sign-out of their SSL.com customer account. If you don’t have a customer account yet, you can create one by following these simple instructions.
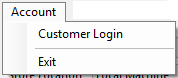
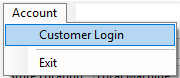
1.1 Logged-out Account Menu
When you are not logged in your SSL.com account in SSL Manager, the account menu only allows you to log in or exit the application.
1.1.1 Customer Login
This menu allows users to enter their customer account credentials and gain access to SSL Manager’s full feature set.
When you click on the Customer Login button, you will be prompted with a message box.
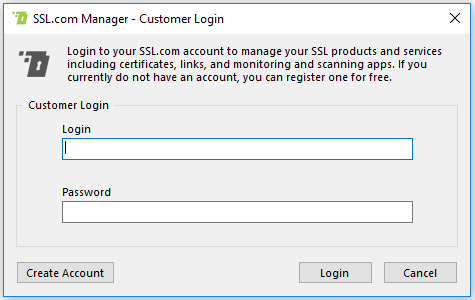
Type your credentials in the input fields and click the Login button. If everything was successful, a message box will inform you.
Otherwise, SSL Manager will show an error message. For troubleshooting information please refer to the appendix.
1.2 Logged-in Account Menu
When you log in to your SSL.com account, the Account menu offers different options as shown in the following image.
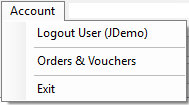
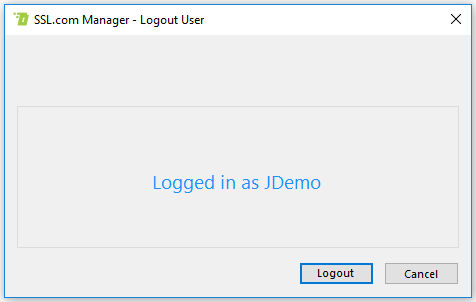
1.2.1 Logout User
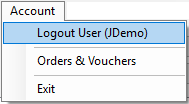
Clicking on the Logout button will log your SSL Manager instance out of your SSL.com customer account. Before actually logging you out though, SSL Manager will prompt you to confirm.
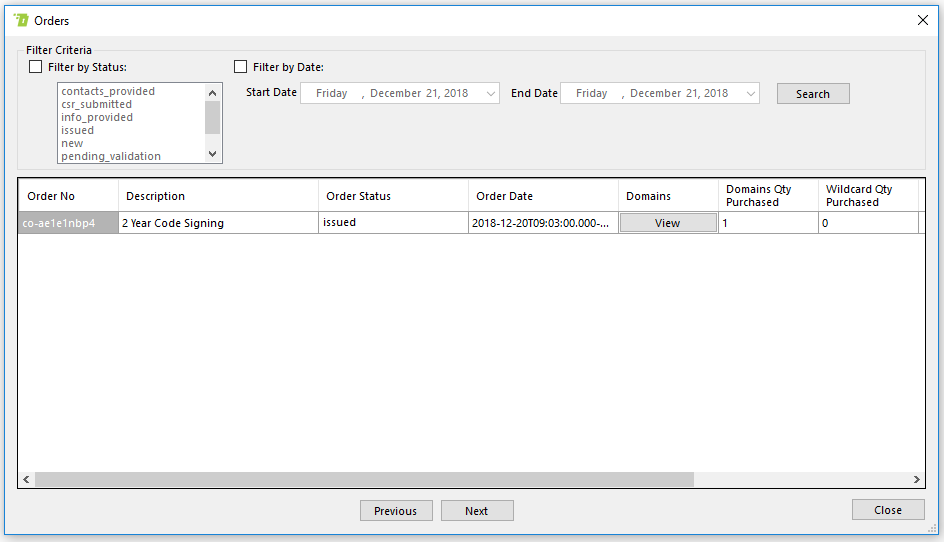
1.2.2 Orders & Vouchers
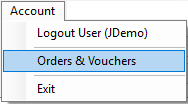
This menu item shows the standing certificate orders you have submitted to SSL.com, along with the status of each such order.
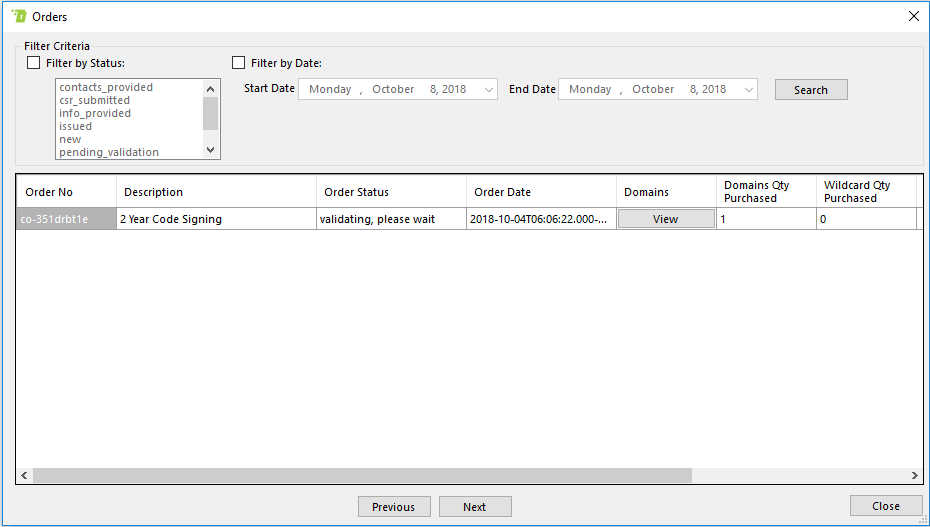
The form allows you to also filter out orders based on two criteria, namely Status and Date.
To filter by status, you can select an item from the Status list and click the Search button.
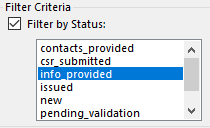
Alternatively, you can use the Date Picker to filter orders issued only in a specific time range.
Please bear in mind that you can use both filters simultaneously.
You can use the navigation arrows ( and ) to navigate to other pages if you can’t find your order in the first one.
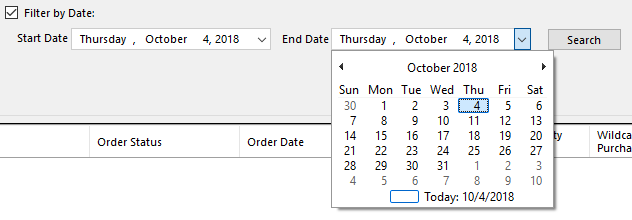
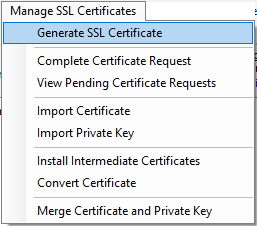
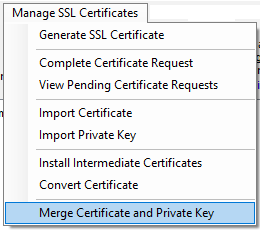
2. Manage SSL Certificates Menu
This menu provides most of the core features that SSL Manager is capable of. As its name suggests this menu allows users to generate and manage their digital certificates. In addition, this menu can be used to import or export certificates, along with installing intermediate certificates.
Each menu item is given its own section:
- Generate SSL Certificate
- Complete Certificate Request
- View Pending Certificate Requests
- Import Certificate
- Import Private Key
- Install Intermediate Certificates
- Convert Certificate
- Merge Certificate and Private Key
2.1 Generate SSL Certificate
This menu item allows users to generate new SSL certificate requests.
Such requests must then be sent to SSL.com for verification, and if all the information is found correct, our backend servers will issue and sign a new SSL certificate for you.
Selecting the Generate SSL Certificate menu item shows the Generate SSL certificate form, which can be used to perform this task.
2.2 Complete Certificate Request
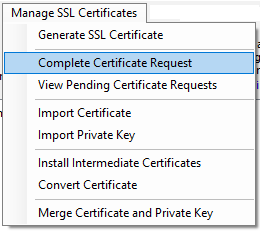
This menu item will install your certificates in the Windows trust store, so that they can be used.
Selecting the Complete Certificate Request menu item will prompt you to select a certificate file and proceed to install it. In case of errors, SSL Manager will show a message box with relevant information.
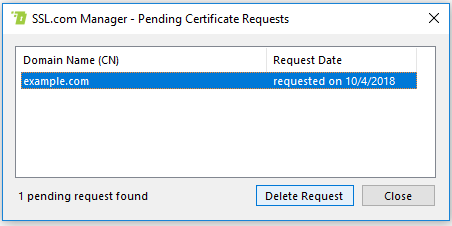
2.3 View Pending Certificate Requests
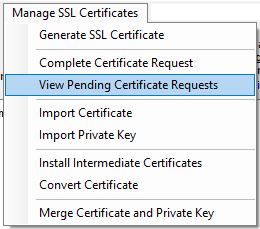
This menu item shows the CSR requests that you have generated, but have not yet been validated by SSL.com. After validation, the certificates will be issued and signed.
Clicking on this menu item shows the following window.
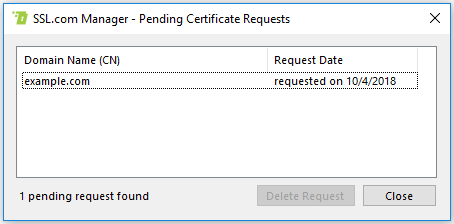
You can remove a request by selecting it from the list and clicking on Delete button. This will also remove it from the main display window.
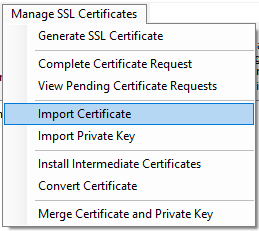
2.4 Import Certificate
This menu item allows the user to install a certificate into any certificate store (including the windows store as in Complete Certificate Request). For more details, please refer to Certificate Import Wizard.
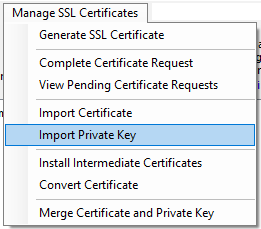
2.5 Import Private Key
This menu item allows the user to import a private key to use when generating a new certificate. For more information, please refer to Private Key Import Wizard.
2.6 Install Intermediate Certificates
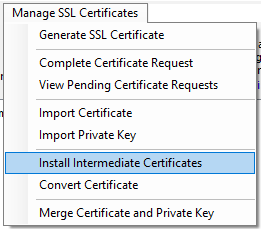
This menu item will contact SSL.com‘s backend and look for the latest intermediate CA certificates. If it finds a newer version than the one that is installed, it will download and install it in your local system producing the following output.
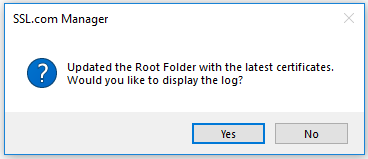
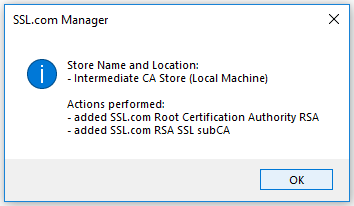
Clicking “Yes” in this message window will show more details on the certificate bundles SSL Manager has just downloaded. An example log is shown in the next image.
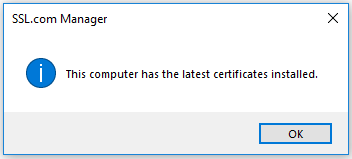
In case that you already have the latest certificates installed, clicking this button will produce the message box shown below.
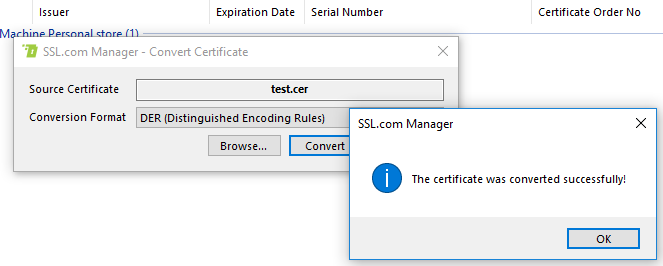
2.7 Convert Certificate

SSL Manager can convert any existing certificate file to several other certificate formats. Clicking this menu item will show the following input form.
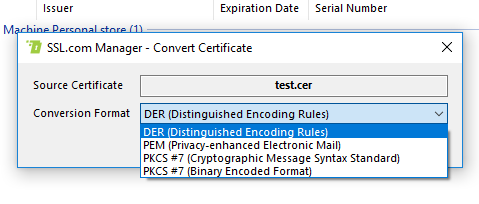
You must specify the path of the source certificate file that will be converted, and choose any of the available output certificate file formats from the list.
Clicking Convert will prompt you for the location of the output certificate file, and will proceed to generate a new certificate file in the selected format.
Finally, a success message box should appear, and you should be able to find your new certificate file in the location you selected.
2.8 Merge Certificate and Private Key
This menu item allows the user to merge a certificate file and the private key corresponding to the public key contained in the certificate, into a single PKCS #12 file.
Clicking the menu item will bring up a modal window containing two large text boxes. As shown in the following image, the left-most pane will show the certificate and the right-most will show the private key.
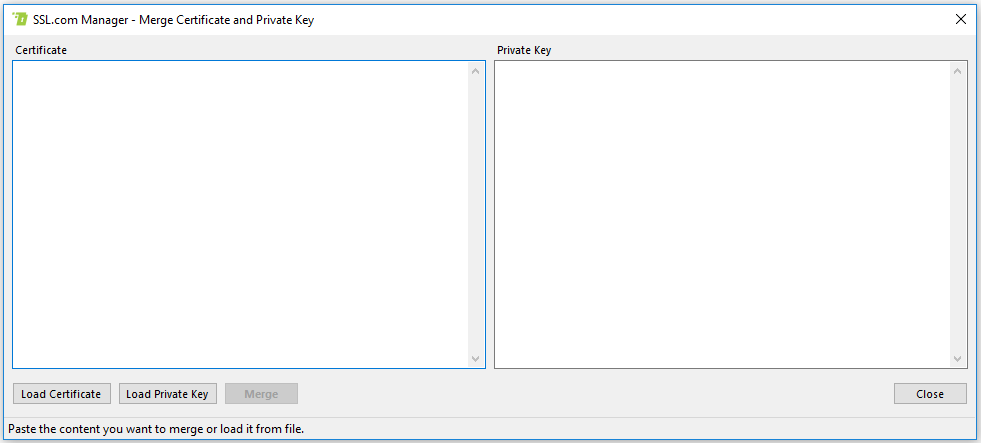
You can either copy and paste the content of the certificate and the private key into each box, or click the Load Certificate or Load Private Key buttons to browse for them.
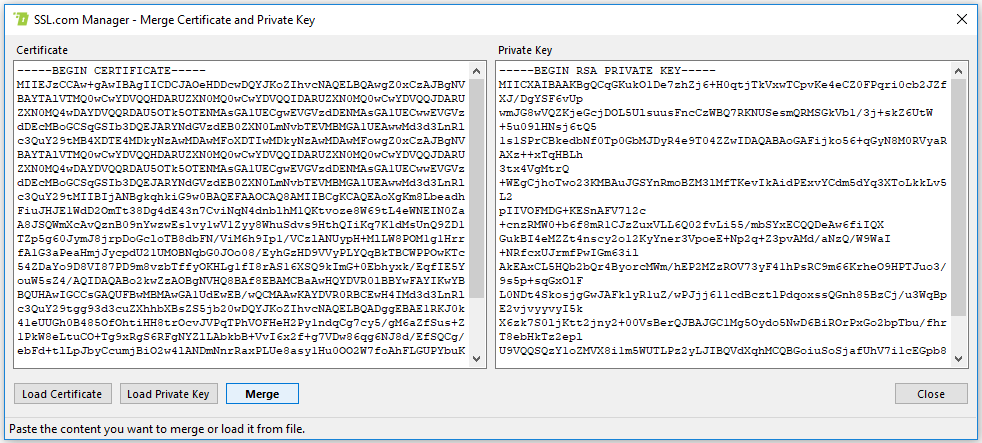
After both files have been loaded, and you are certain that the loaded private key corresponds to the selected certificate, you may click the Merge button to complete the process. An explorer window will show up to allow you to select the destination and name for the output bundle.
If no errors show up, then you can find the certificate and key bundle in the location you have specified.
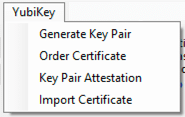
3. YubiKey Menu
![]()
The YubiKey menu allows users to generate key pairs and install document signing and EV code signing certificates on YubiKey FIPS USB tokens. For detailed instructions on working with your YubiKey and SSL Manager, please refer to this how-to.
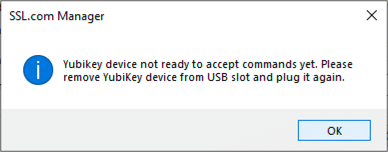
Note: When working with a YubiKey and SSL Manager, users may occasionally see a dialog box letting them know the Yubikey is not ready to accept commands. If this happens, unplug the YubiKey, plug it back in, close the dialog box, and repeat the preceding step.
3.1 Generate Key Pair
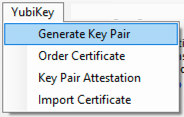
The Generate Key Pair menu item is used to generate cryptographic key pairs on the user’s YubiKey.
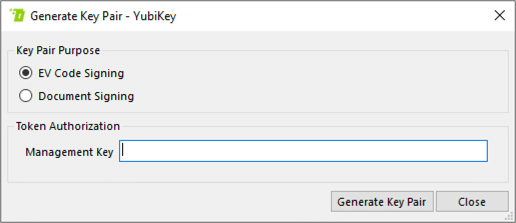
Selecting this menu item opens the Generate Key Pair dialog box. Here, the user can select the purpose for the key pair (EV Code Signing or Document Signing), which determines the slot in the YubiKey where the key pair will be generated and stored. After the user enters the YubiKey’s Management Key and clicks the Generate Key Pair button, a 2408-bit RSA key pair will be generated on the YubiKey.
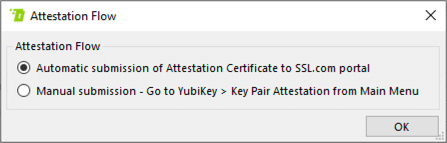
After generating the key pair, the user will be presented with the Attestation Flow dialog box. Choosing Automatic Submission will lead the user through a series of dialog boxes for certificate ordering and attestation. Please refer to this how-to for full details of the ordering and installation process.
3.2 Order Certificate
The Order Certificate menu item is used to create certificate orders using key pairs that have been previously generated on the YubiKey.
Selecting this menu item will lead the user through a series of dialog boxes for certificate ordering and attestation. Please refer to this how-to for full details of the ordering and installation process.
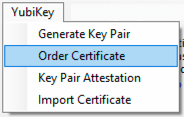
3.3 Key Pair Attestation
The Key Pair Attestation menu item generates attestation certificates that can be used to prove that key pairs have been securely generated and stored on the YubiKey FIPS token. These certificates can be used in the SSL.com user portal to order certificates to be installed on the YubiKey.
Selecting this menu item will open the Key Pair Attestation dialog box. Here, the user can select the key pair to generate an attestation certificate for (EV Code Signing or Document Signing).
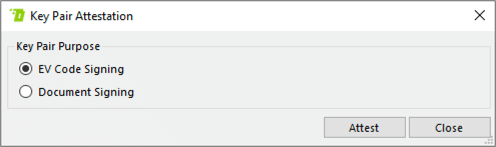
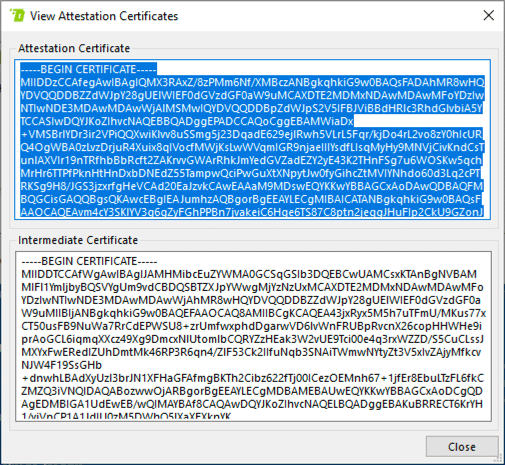
After clicking the Attest button, the View Attestation Certificates window will open, displaying the Attestation Certificate and Intermediate Certificate. These can be cut and pasted by the user into a text file or directly into a certificate order in the SSL.com user portal.
3.4 Import Certificate
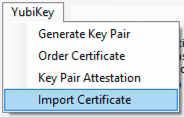
The Import Certificate menu item allows users to import certificate files into their YubiKey, such as in cases where a key pair has been generated on the token but the certificate order was created in the SSL.com user portal.
Selecting this menu item will open the Import EV Certificate dialog box. Here, the user can select the Certificate Purpose (EV Code Signing or Document Signing), enter their Management Key and PIN, select a certificate file via the Browse button, then click the Import Certificate button to install the certificate in their YubiKey.
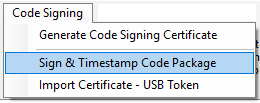
4. Code Signing Menu
The Code Signing menu allows users to create and import certificates for signing. In addition, it provides an easy interface to sign executable files.
4.1 Generate Code Signing Certificate
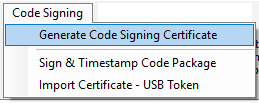
This menu item allows users to request a new SSL certificate that can be used for code signing.
Such requests must then be sent to SSL.com for verification, and if all the information is found correct, our backend servers will issue and sign a new SSL certificate for you.
Selecting the Generate Code Signing Certificate item shows the Generate Code Signing certificate form, which can be used to perform this task.
4.2 Sign & Timestamp Code Package
This menu item shows an input form that asks the user for the necessary information to sign a code package or executable file.
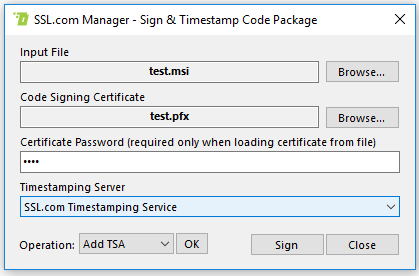
In this form the user can select the location of the executable file, along with the certificate file and the certificate’s password (if any).
Finally, the user can opt to insert a timestamp in the resulting signed binary file, by selecting a timestamp server from the dropdown menu. For more robustness in your applications, we recommend using SSL.com‘s in-house timestamping service.
The supported executable file formats are:
- MSI
- EXE
- DLL
- OCX
- SYS
- CAT
- CAB
- XTL
- XAP
Finally, the Operation parameter refers to whether this operation will add a new timestamp or edit an already existing one (including the option to delete).
Clicking on the Sign button will prompt for the location of the output signed executable. SSL Manager will then proceed to sign the file and present a message box about the status of the operation.
In case of any errors, please refer to the appendix for troubleshooting information.
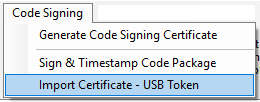
4.3 Import Certificate – USB Token
This menu item will install an EV code signing certificate in a USB token device. Please note that this requires the Safenet client to be installed in your system. Note: for working with EV code signing and document signing certificates in YubiKey FIPS tokens, please use the YubiKey menu.
To use this functionality you must first insert your USB token in the USB port of your computer and proceed to select Import Certificate – USB Token from the Code Signing menu.
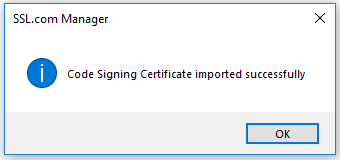
Clicking on this button will prompt you to select a code signing certificate from local file storage and install it in the device. SSL Manager will show a message box with the result of the procedure.
5. Settings Menu
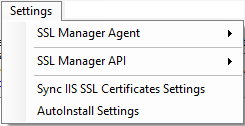
The Settings menu allows users to configure the SSL Manager agent options.
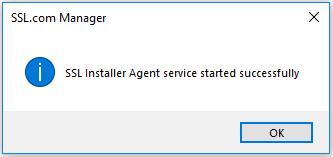
5.1 SSL Manager Agent
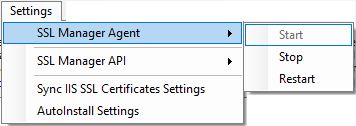
This menu allows the user to control the execution of SSL Manager agent.
This menu can Start, Stop, or Restart the agent service. After clicking on one of these buttons will present a message box with the status of the operation.
5.2 SSL Manager API
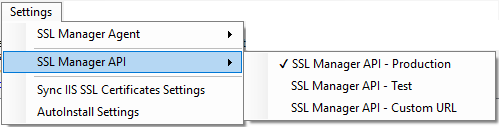
This menu allows users to specify which backend SSL Manager will use to issue, sign and verify certificates. By default, it uses SSL.com’s production backend for all certificate-related operations, which is the same all our customers use.
The user can also opt to use our testing infrastructure which is not billable, so that they can experiment with their configuration or different types of certificates before using the production backend. Keep in mind though, that certificates issued with the testing backend will not be recognised by browsers or other client software by default.
Lastly, SSL.com’s customers may require a custom-tailored PKI solution to exactly address their needs. SSL Manager allows users to specify custom PKI backends by URL. For more information about private PKI backends, drop us an e-mail at support@stg.ssl.com.
5.3 Sync IIS SSL Certificates Settings
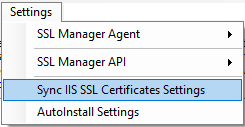
This menu item allows the user to control how often IIS SSL Certificates are synchronized with SSL.com Team. Clicking on this item will present the following window.
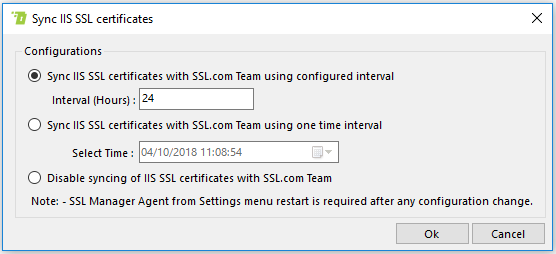
After configuring the sync intervals, you must click the OK button for SSL Manager to apply the settings.
5.4 AutoInstall Settings
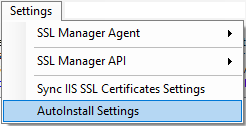
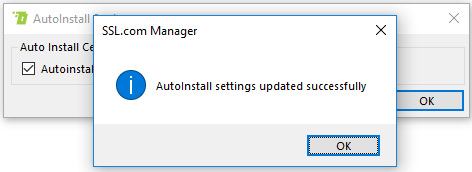
This menu button allows users to choose whether SSL Manager will install SSL.com’s root and intermediate CA certificates in the local machine. By default, SSL Manager will install all required certificates, however users’ needs may require different certificate bundles. Clicking this button will bring up the following modal window.
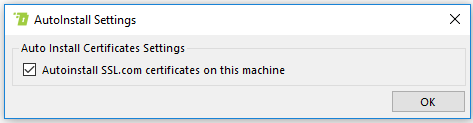
Click on the check-box to toggle AutoInstall and then click the OK button to save your preference. A message box is shown upon success.
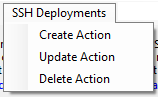
6. SSH Deployment Menu
SSL Manager can deploy your certificates in your server using SSH. This menu allows you to create and manage actions. Each action is a deployment configuration, consisting of the IP address and credentials required to log in to the remote SSH server, the locations in the remote server for the deployed certificates and keys, and optionally two sets of commands, pre-deployment and post-deployment commands, to be executed before and after the deployment procedure respectively.
If you are looking for instructions on how to actually execute a deployment action, please check our context menu section.
Please take a look at the following sections for more details on this menu.
6.1 Create Action
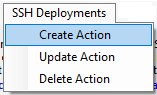
This menu item allows you to create a new deployment configuration, called an action in SSL Manager’s jargon. Clicking this button will open the following form.
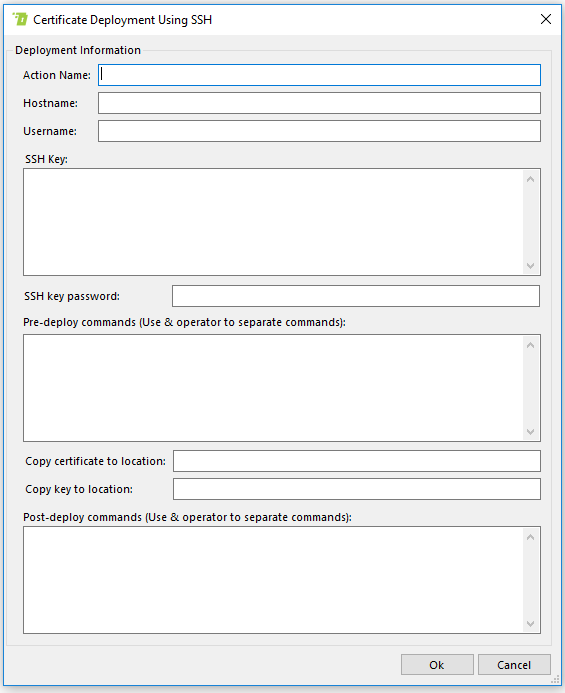
Consider entering a clear and concise Action Name that best describes the function of the new action you are creating. When you try to execute this action you will have to select it from the actions list, by this name.
In the next field, Username, you have to enter the username of the user in the remote SSH server that you will connect to. SSH requires a public key to be installed in the remote server that corresponds to a private key that an authorized SSH client holds. Whenever the client wants to log-in to the remote server, it uses the private key to inform the server. SSL Manager works the same way, and you have to copy and paste your private key in the SSH Key field.
Normally, SSH keys require a passphrase to work. This functions as an additional security layer that requires an attacker to both have possession of the key and knowledge of your secret passphrase in order to use the key. Please type your key’s passphrase in the SSH Key Password field.
Following the credentials, is the Pre-deploy Commands field. In this text field you can type normal Bash commands. SSL Manager will take these commands and execute them in the remote server (over the SSH connection) before the deployment procedure begins. Similarly, the Post-deploy Commands field accepts Bash commands that will be executed after the certificates have been deployed. The pre- and post-deployment commands feature allows you to have complete control over the deployment process.
Finally, you have to specify the paths in the remote server where the certificate and its key will be deployed. After, you’ve filled the action form, you may click the OK button to create and store the action.
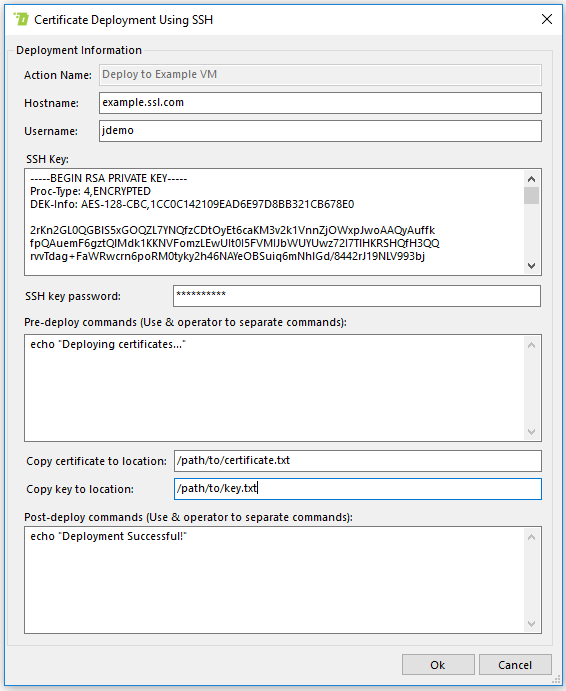
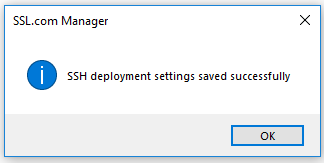
After the action has been created, you will be informed of the status by SSL Manager.
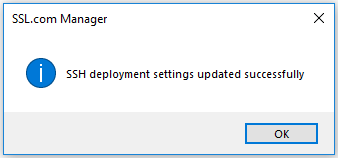
6.2 Update Action
This menu item allows you to edit an SSH deployment action. Selecting this item will show the actions list, which will allow you to specify which action you wish to edit.
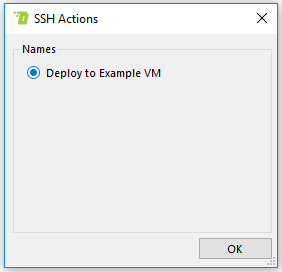
Click on the option box next to the action you wish to edit in order to enable it, and then click OK to open the action editing form.
This form is the same as in the Create Action menu above. Please consult the previous section for more details on the text input fields. After you have completed your changes in this form, you may click OK to store the changes, or click Cancel at any time to discard them.
After a successful update, you will be shown a message box with the status of the operation.
6.3 Delete Action
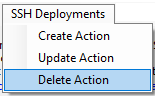
This menu item allows you to permanently delete an SSH deployment action. Selecting this item will open the actions list, where you can select the action you wish to delete.
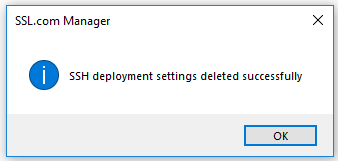
Enable the option box next to the action that you wish to delete and click OK to delete it. SSL Manager will proceed to delete the action and show a message box informing you about the status of the operation.
If at any point you wish to leave this form and not delete an action, you may click on the X icon in the list’s title bar.
7. Help Menu
![]()
The Help menu contains general information about SSL Manager
7.1 About SSL.com Manager
![]()
Clicking on this button will show a modal window containing basic information about this instance of SSL Manager.
8. Context Menus
In Windows, context menus are drop-down menus that appear by right-clicking on an item in a window. The “context” part refers to the fact that their contents change depending on what it was you just right-clicked.
SSL Manager provides context menus as an alternative interface, so that the user can more intuitively perform common tasks. The following sections provide more in-depth details on each individual context menu.
8.1 Right-click on Certificate Context Menu
SSL Manager provides additional functionality in an easy-to-access context menu, by right-clicking on a certificate.
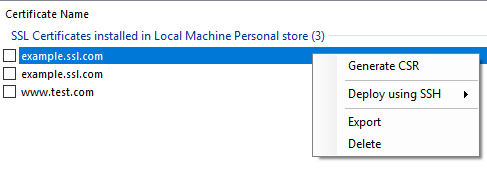
8.1.1 Generate CSR
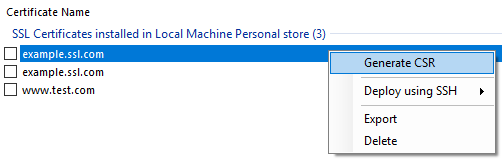
Generates a certificate signing request. Refer to section 9.4 for more details.
8.1.2 Deploy using SSH
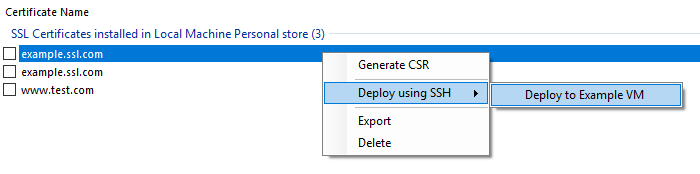
Right-clicking a certificate and selecting Deploy using SSH will open a list of available (i.e. previously created) deployment actions. To learn more about actions and how to manage them, please take a look at the SSH deployment menu section.
Clicking on a specific action will open the action in read-only mode. That is, you will be able to see all the action’s details, but you will not be able to edit them. For that, you will have to use the Update Action menu.
Once you are sure that this is the action you want to execute and that all details are correct, you may click the Deploy button to start the process.
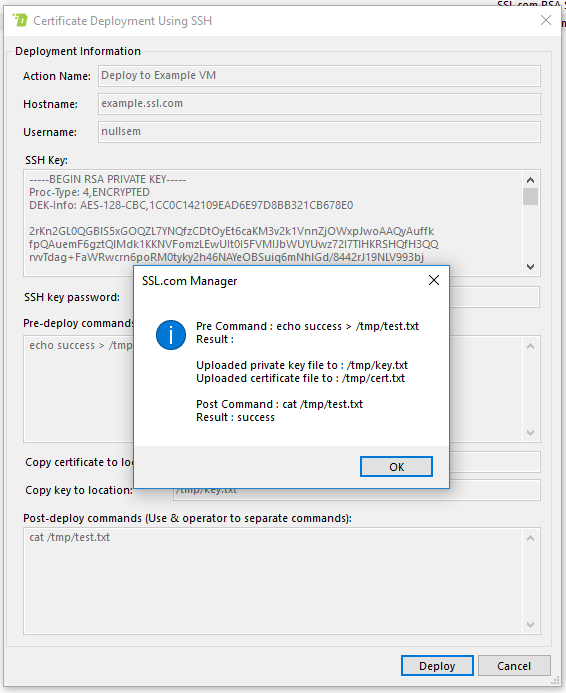
The deployment process may take some time, but afterwards you will be shown the above message, containing the status of the pre-deployment and post-deployment commands, as well as the status of the deployment procedure itself.
8.1.3 Export
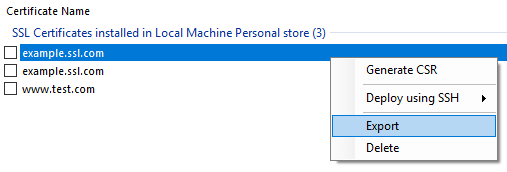
Right-clicking a certificate and selecting Export will bring up Certificate Export Wizard. Follow the wizard’s instructions to export the certificate to a file.
8.1.4 Delete
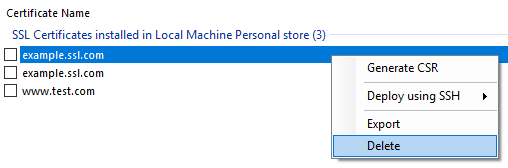
Selecting Delete in the context-menu will uninstall the certificate from any certificate stores, and delete it from SSL Manager.
8.2 Right-Click on a generated CSR Context Menu
Right-clicking on a pending certificate signing request opens up a context menu with additional functionality relevant to pending CSRs. These CSRs have been created locally, but have yet not been submitted to SSL.com‘s backend for validation.

8.2.1 View Request
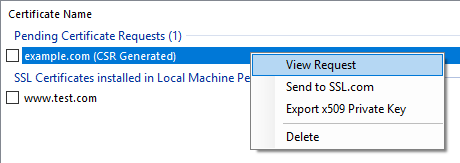
This menu item shows a modal window with the pending certificate request details.
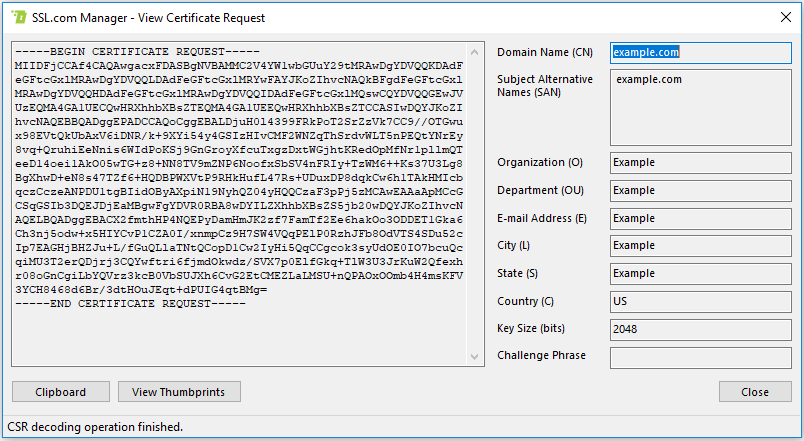
The View Certificate Request window can also show the cryptographic thumbprints of the certificate request by clicking the View Thumbprints button.
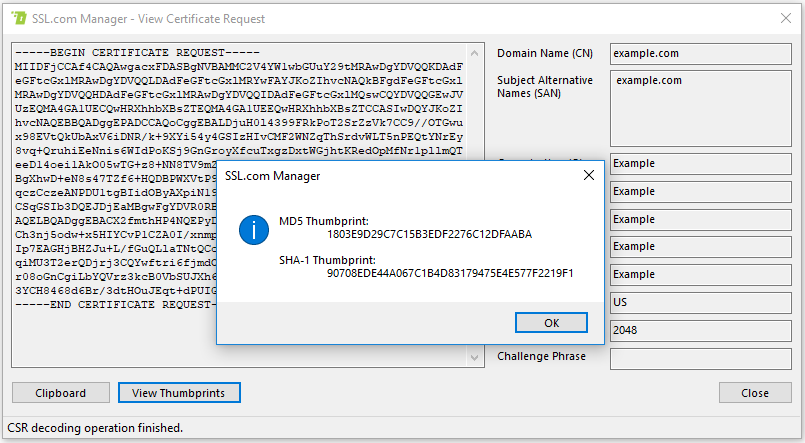
Finally, this window also allows the user to copy any of the information to the clipboard.
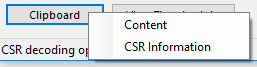
To copy the content of the CSR, click the Clipboard button and then Content. A message should appear to inform you about the operation.
Similarly, to copy the information contained in the CSR, click on “Clipboard” and then “CSR Information”.
8.2.2 Send to SSL.com
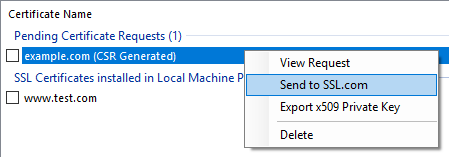
This menu button allows the user to send the generated CSR to SSL.com for verification.
Before our PKI signs a certificate for you, we must verify that the details contained in the request are valid. After this step, the certificate is issued and signed.
Clicking on this button will show a modal form, that will allow you to submit your request. You can find more information here.
8.2.3 Export x509 Private Key
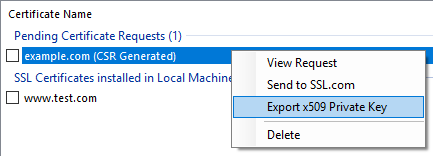
This menu item will export the private key generated for this certificate request to a PKCS#12 file. Clicking on this button will prompt you for the output location.
8.2.4 Delete
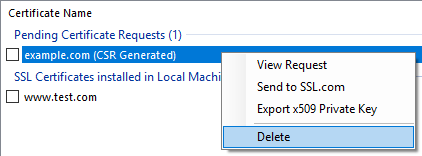
This button will delete a CSR from SSL Manager, and remove it from the pending CSR list in the main display window.
8.3 Right-Click on a submitted CSR Context Menu
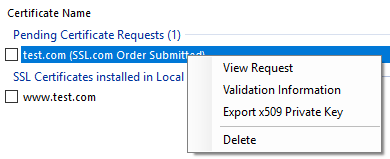
In contrast to the menu described in section 8.2, this context menu appears for CSRs that have already been submitted to SSL.com‘s backend.
8.3.1 View Request
The same as 8.2.1.
8.3.2 Validation Information
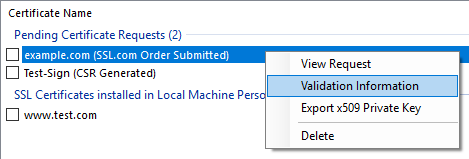
This button allows the user to perform automated certificate information validation for DV certificates.
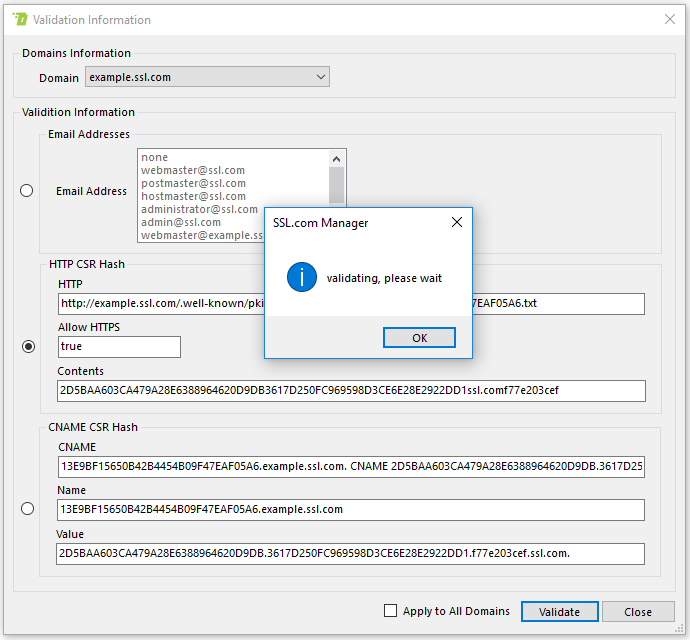
Clicking the Validation Information button shows a modal window.
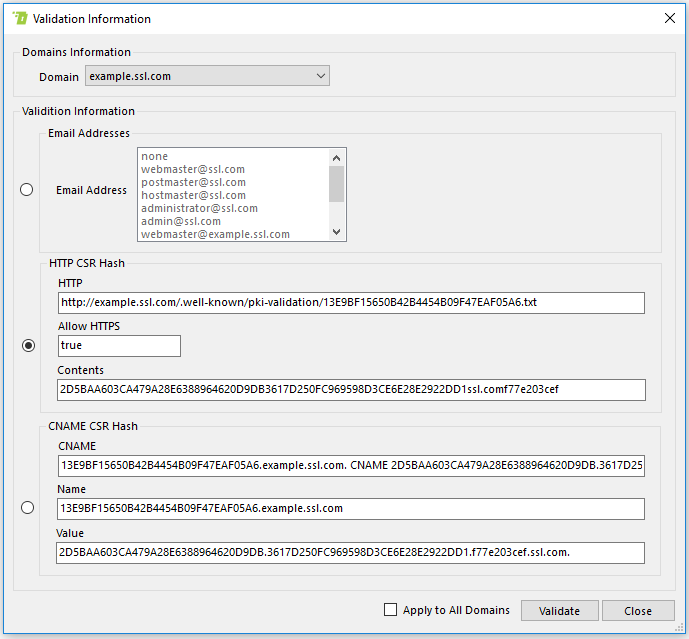
In this window you can select the domain that will be validated, along with the method of validation. There are three methods currently supported:
- E-mail Validation
- Domain CSR Hash
- CNAME CSR Hash
If you are unfamiliar with domain validation methods and how they work, you can find more information about them here.
For example, to validate using a CSR hash, you must select the HTTP CSR Hash validation method using the relevant option box and use the information in the form to create the correct hash file in your server (i.e. /var/www/html/.well-known/pki-validation/<CSR Hash>.txt) that contains the expected information.
After you have selected the domain and method, click the Validate button to actually send the validation order. SSL Manager will display a message box informing you about the validation process and the CSR will change status in SSLM’s main display window to Domain Validation Triggered.
Visiting the Orders & Vouchers window will show the CSR request’s status.
![]()
When SSL.com‘s backend completes your request, SSL Manager will update the order’s status and SSL Manager’s Agent will automatically download and install the newly issued certificate into your local Windows trust store.
To view or export the certificate you may use the right-click context menu in SSL Manager’s main display window.

8.3.3 Export x509 Private Key
The same as 8.2.3.
8.3.4 Delete
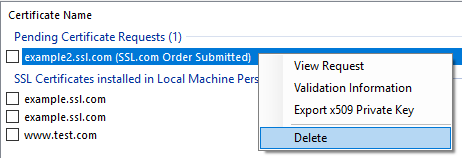
This context menu button will delete the submitted CSR from SSL Manager and remove it from SSL Manager’s main display window.
Clicking the button will show a warning requiring you to confirm that you actually want to delete the selected CSRs.
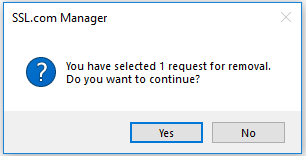
Click “Yes” to actually delete the CSRs from SSL Manager.
9. Wizards
9.1 Certificate Export Wizard
This wizard allows users to export any certificates handled by SSL Manager into various formats. It can also package the private key in with the exported file.
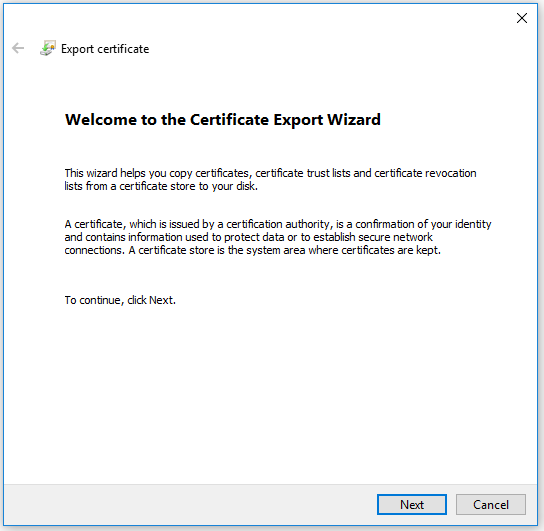
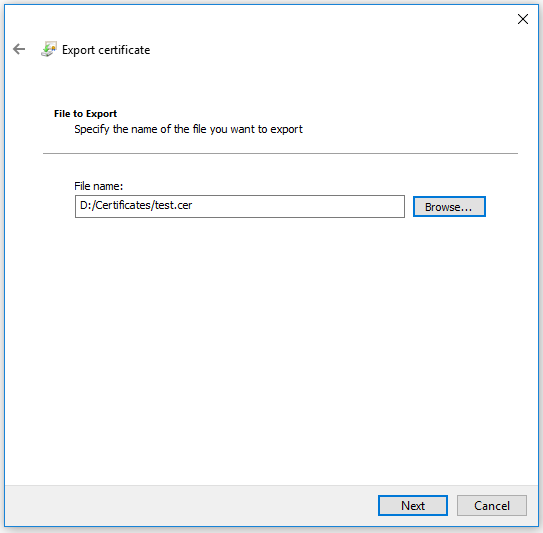
Using the wizard is straightforward. When you first click the Export button, it brings up the “Certificate Export Wizard”, shown in the following image.
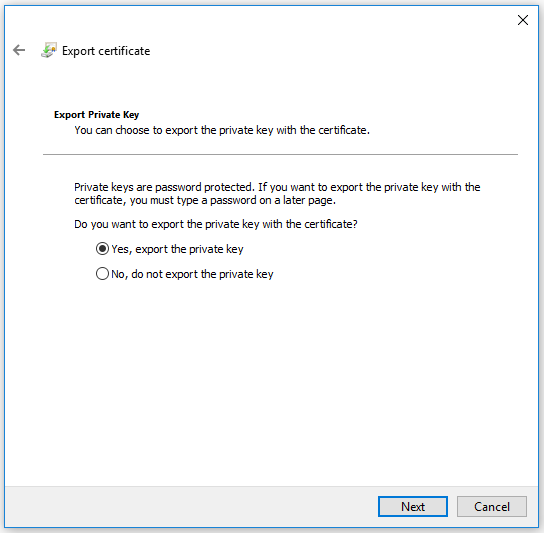
Clicking “Next” will present you with the option to include the private key along with the certificate.
If you need to include the private key in the exported bundle, read on. Otherwise, you can jump to the next section for instructions on how to export a certificate without a private key.
9.1.1 Export with a private key
When you are presented with the choice in the “Certificate Export Wizard”, you must select the “Yes, export the private key” option.
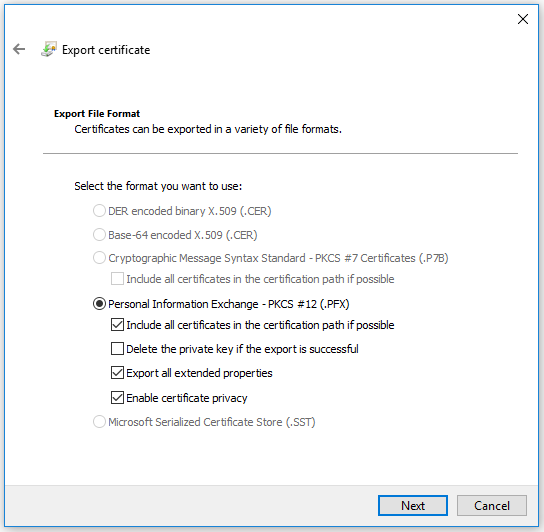
Clicking “Next” will ask you about the export format. Currently, only the PKCS #12 format is supported for certificate bundles that contain private keys.
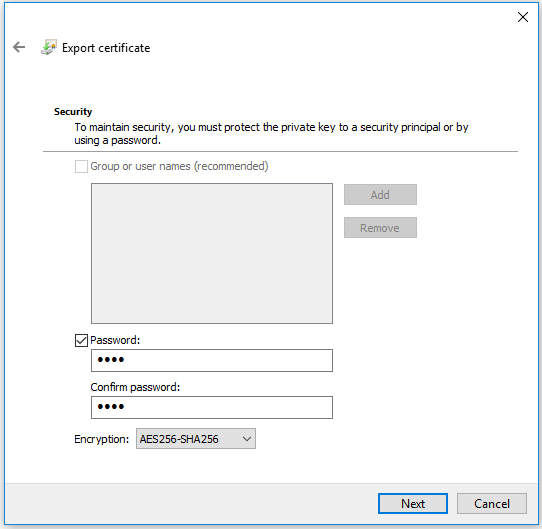
After you’ve selected the export file format you will be prompted to enter a password for the exported certificate file, so that it will be unreadable to anyone without the password.
The next form will prompt you for the location you wish the exported bundle to be saved.

Finally, the “Certificate Export Wizard” will show a short summary of your choices, so that you can confirm that everything is correct before performing the export operation.
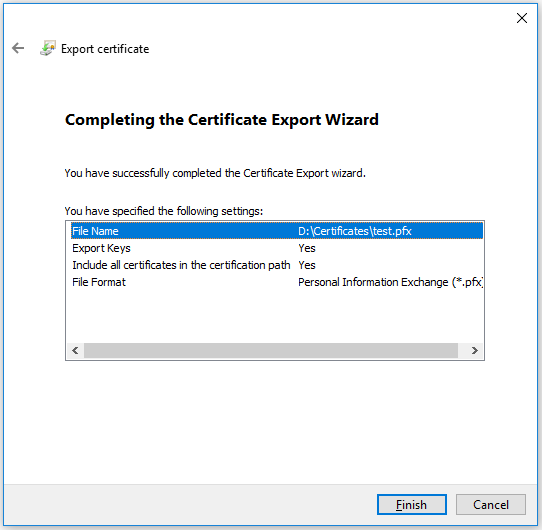
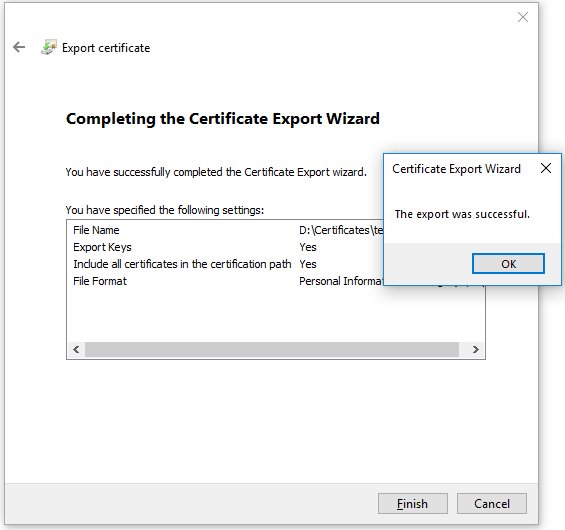
Clicking on “Finish” should create the certificate bundle and show a message box about the export operation being successful.
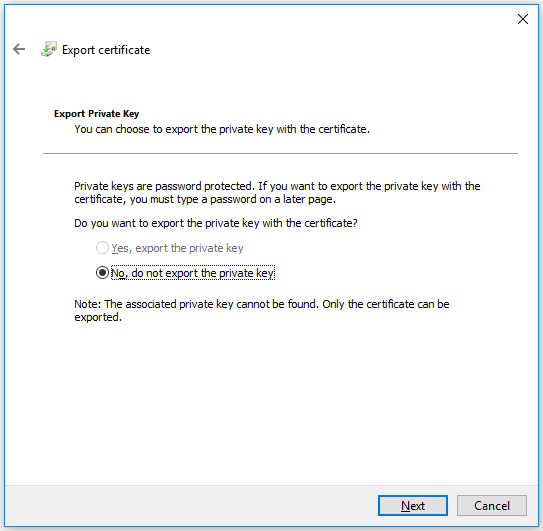
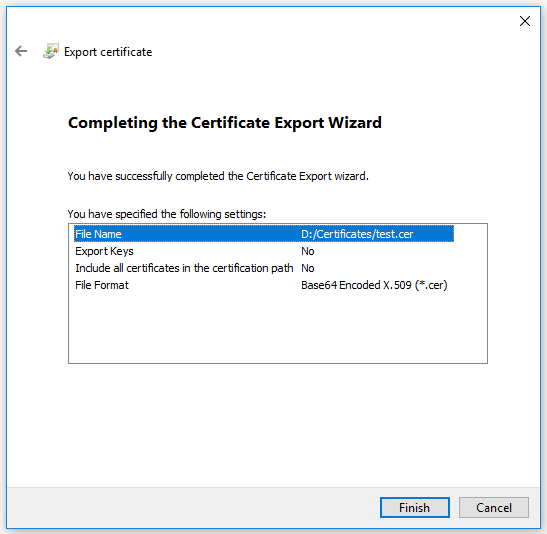
9.1.2 Export without a private key
To export a certificate without its accompanying private key, you must select “No, do not export the private key” in the “Certificate Export Wizard”, as it is shown in the following image.
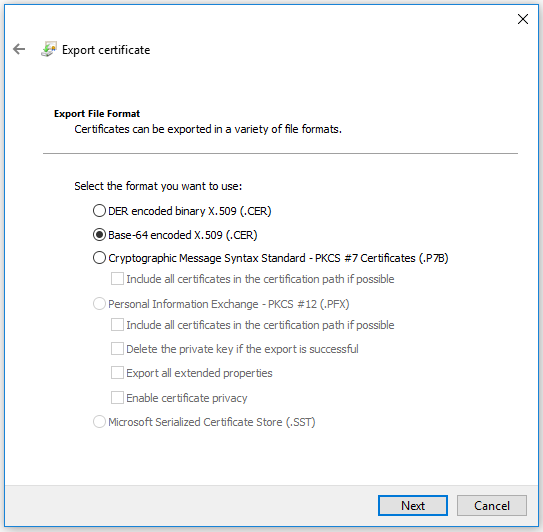
Clicking “Next” will prompt you to select the format of the exported certificate file, and the location it should be saved.
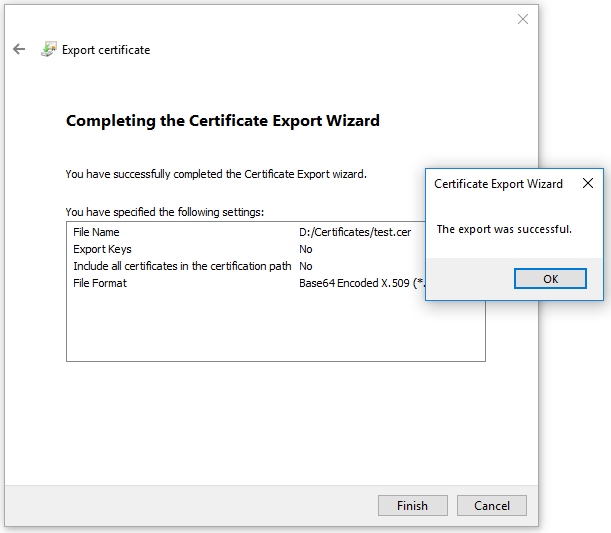
Finally, the wizard will show a short summary of the selected options until this moment, allowing the user to confirm that everything is as it should be before performing the export operation.

Clicking “Finish” should export the certificate in the chosen location, and show a message box about the operation being successful. This is shown in the next image.
9.2 Import Certificate Wizard
This wizard allows users to install a certificate into a certificate store.
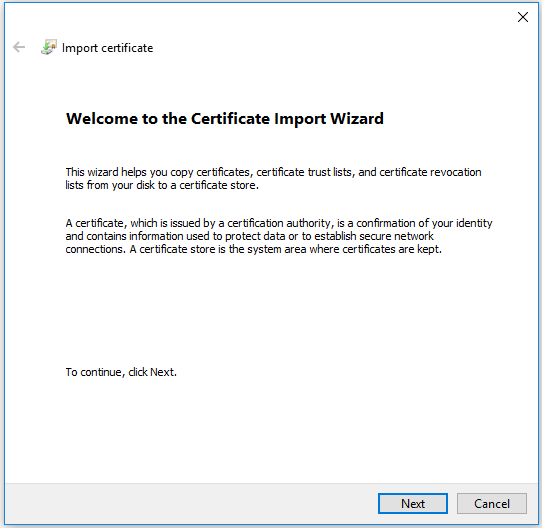
To see this wizard, you can use the Import Certificate drop-down menu. Doing so will show the following window on the screen.
The next two forms will ask for the location of the certificate file you want to import, along with the location of the certificate store.
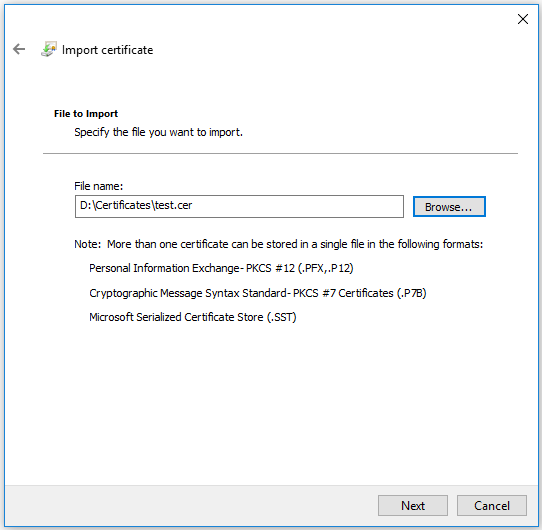
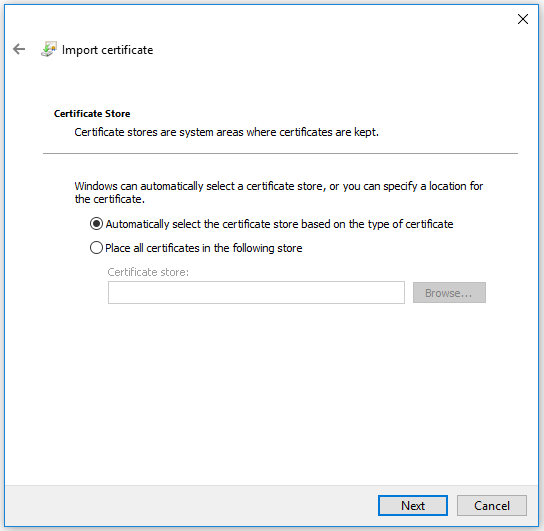
If you don’t have your own certificate store, you should allow Windows to choose the certificate store that best suits the certificate type you have provided.
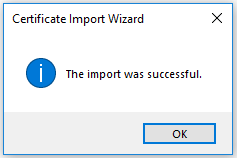
Clicking “Next” will show a confirmation dialog.
Finally, clicking “Finish” will install the certificate and present a message box informing you about the operation’s success.
9.3 Import Private Key Wizard

This wizard allows a user to import a private key for use when generating a new SSL certificate (code-signing or otherwise).
To show this window you can either use the Import Private Key drop-down menu, or click the “Import Private Key” button in the Generate SSL Certificate window.
This wizard asks for the contents of a private key. The user can either copy and paste the contents of a base64 encoded key, or browse for a private key file by clicking on the “Load From File” button.
In both cases, it is important to understand that the private key must be a text file. Regardless of whether you pasted into the input box or loaded it using explorer, the contents of the file will be shown in the text box. This means that the contents should be text and not binary.
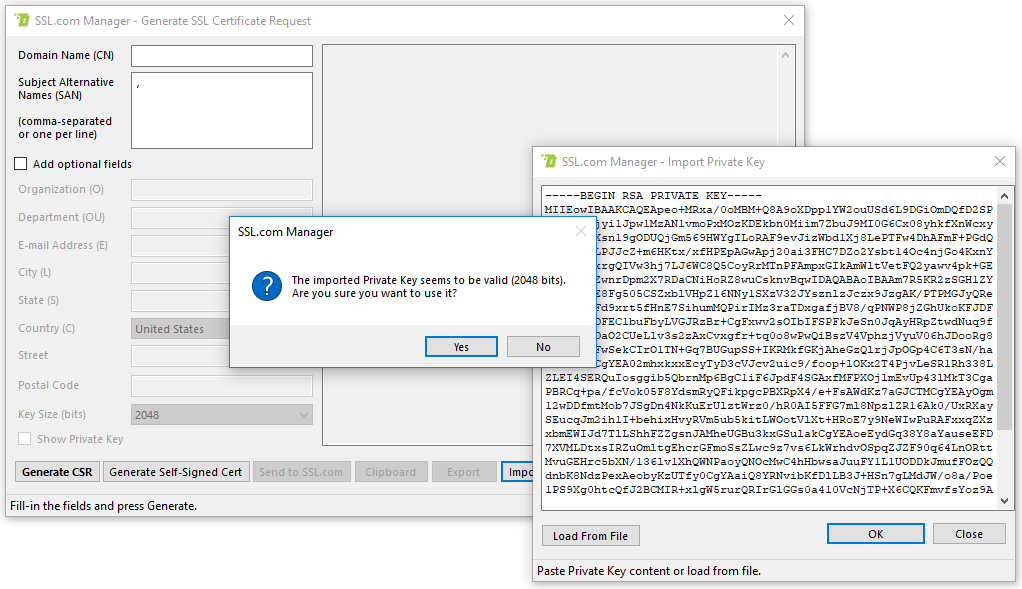
Clicking “OK will import the key and it will be used in the subsequent CSR generation.
In case you encounter an error when importing private keys, please refer to the appendix for troubleshooting information.
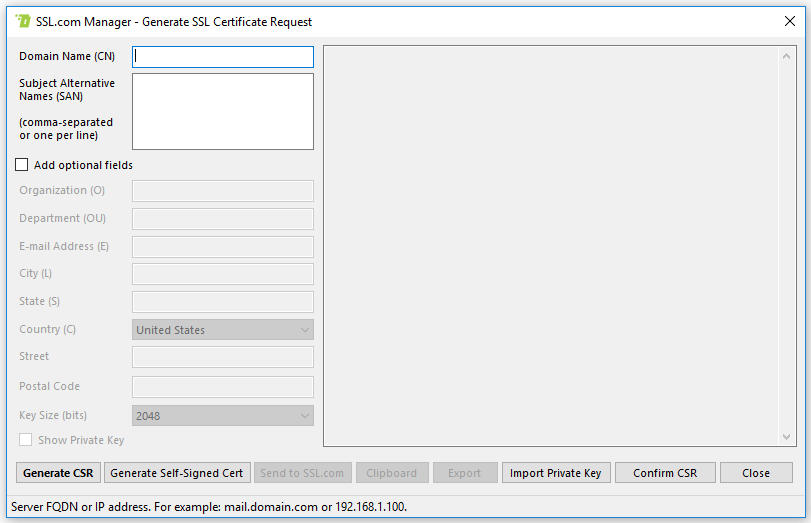
9.4 Generate SSL Certificate Request Form
This form allows users to generate a new SSL certificate of any type, and for any use. That is, except code signing. For code signing certificates please refer to section 9.6.
To see this window click on “Generate SSL Certificate” button in the Manage SSL Certificates menu.

The mandatory information for every SSL certificate is the domain name (and alternative domain names if any) that it is issued for. Furthermore, this form allows the user to input additional information by checking the “Add optional fields” check-box.
After filling out the required information you can choose whether this certificate will be:
- signed by SSL.com’s Certificate Authority, or
- self-signed by a private key you control.
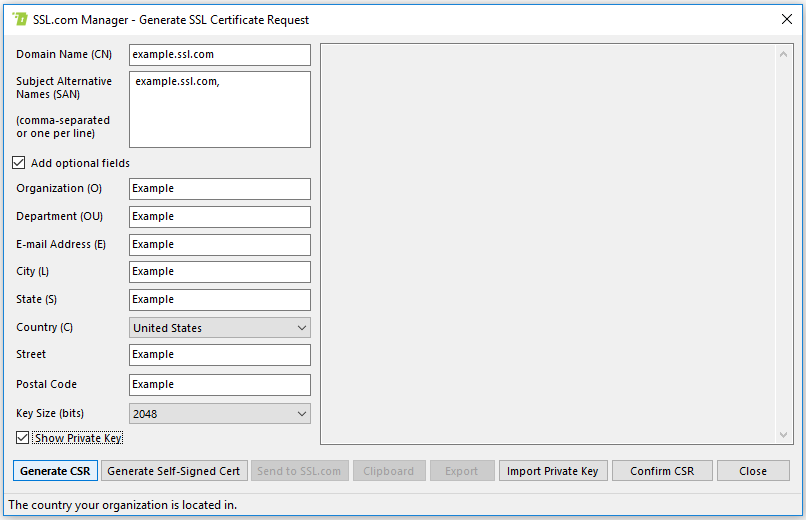
To create a self-signed certificate, click on “Generate self-signed”. Otherwise, to get a certificate signed by SSL.com’s CA certificate, click on “Generate CSR”.
9.4.1 Generate a Self-Signed Certificate
Clicking on “Generate Self-Signed Cert” will generate the certificate and install it in the local OS trust store.
Self-signed certificates are displayed in SSL Manager’s main window, under the “Certificates” section. You can use the right-click context menu to interact with them.
9.4.2 Generate CSR
Clicking on the “Generate CSR” button will create a new certificate signing request, which will be presented in the side pane of the window.
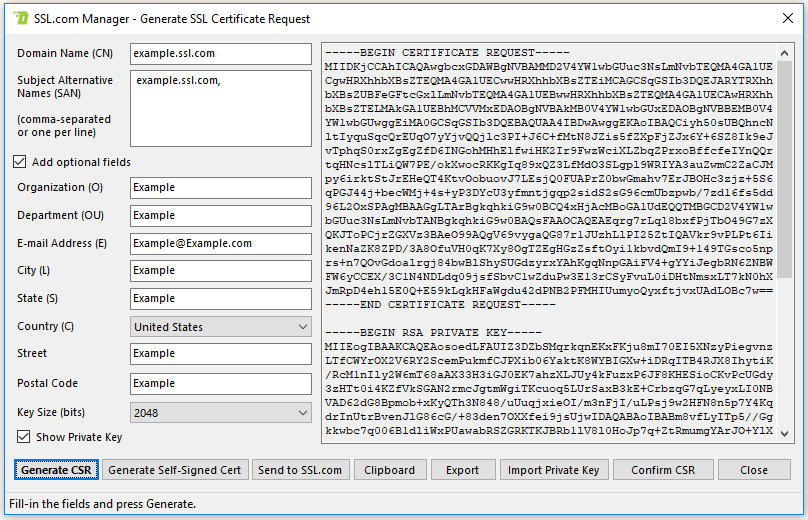
This CSR will also be shown in SSL Manager’s main display window, under “Pending Certificate Requests”.
CSRs are generated locally, but they must be sent to SSL.com’s backend to be verified and signed. To submit them to SSL.com, you can either use the “Send to SSL.com” button in this form, or use the right-click context menu.
You can find more information on how to submit a CSR here.
9.4.3 Import Private Key
See section 9.3 for more details.
9.4.4 Confirm CSR
The “Confirm CSR” button will verify the integrity of the request, by checking its digital signature. If the CSR has been altered or corrupted, this signature check will produce an error and SSL Manager will throw a warning message. It is useful to verify your CSRs, because invalid requests are rejected by SSL.com’s backend.
9.5 Send to SSL.com Form
This form allows users to submit a pending certificate request to SSL.com’s backend for verification and signing.
Self-signed certificates and CSRs are generated and stored locally. But for SSL.com to actually issue a certificate, you must submit a request using this form.
This form can be found by clicking “Send to SSL.com” in the Generate SSL Certificate Request form, or through the pending CSR context-menu.
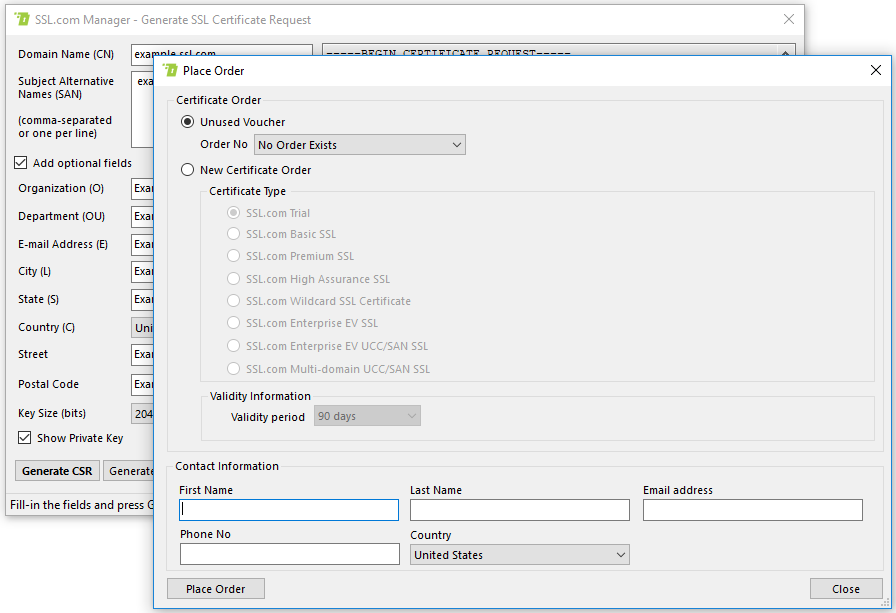
The “Place Order” form allows the user to either create a new CSR from scratch, or reuse a previously submitted one as a template.
To use a previously submitted CSR, check the “Unused Voucher” radio button and use the drop-down list to select an order.
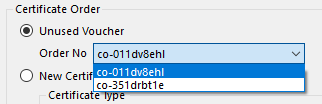
Afterwards, you can edit the information as required and click on “Place Order” to submit the request.
If you want to create a new certificate request, check the “New Certificate Order” radio button and fill in the form.
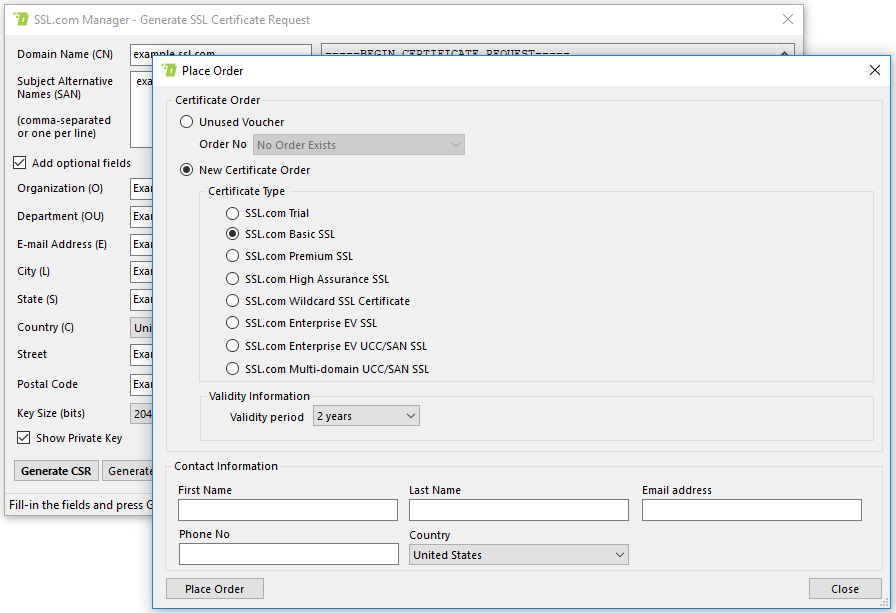
First you must select the type of the certificate you need us to issue. You can find more information about SSL.com‘s certificates here or an introduction to the different types of certificates here.
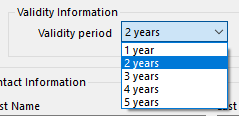
Next, select the time period this certificate will be valid, using the drop-down menu.
Finally, type the contact information of the person that will manage this certificate.

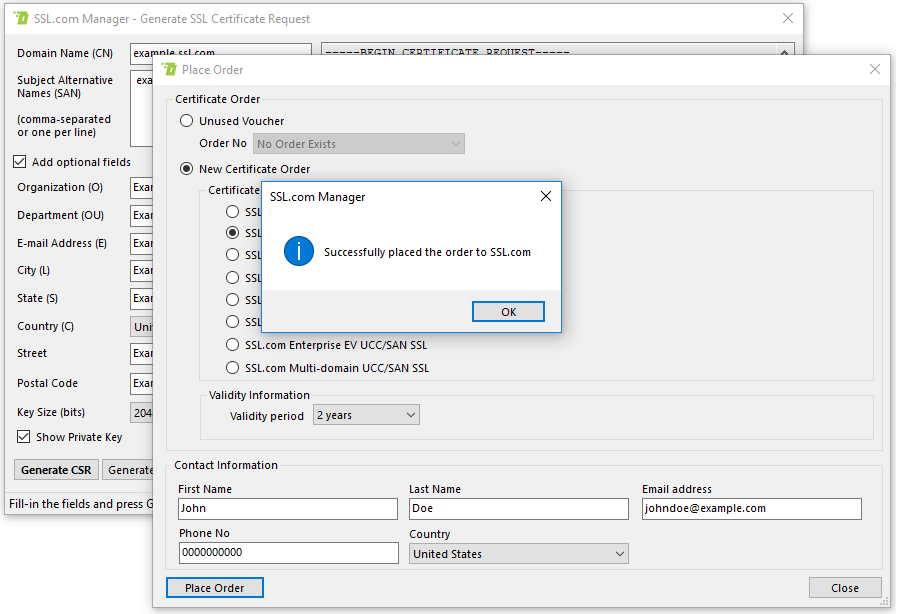
Clicking on “Place Order” will submit the CSR to SSL.com’s backend and show a message box with the status of the operation.
All standing certificate orders can be found using the Orders & Vouchers menu.
9.5.1 Send to SSL.com Code-Signing Form
If the certificate request pertains to a code-signing certificate, then the form shown is different than the one shown in section 9.5.
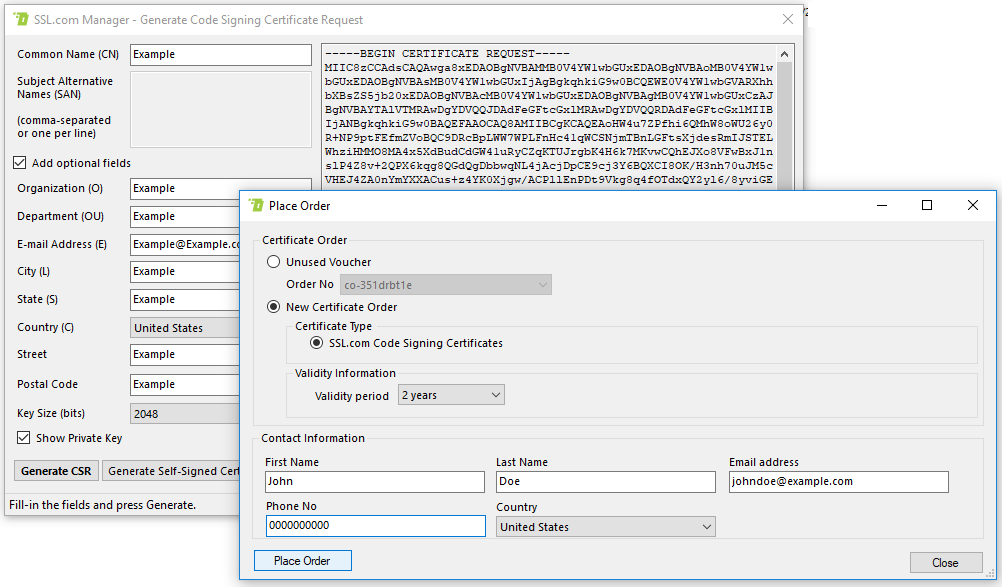
In this case, the certificate types are not the same as normal SSL certificates, as shown in the following image.

The other fields are the same as when submitting a CSR for a normal SSL certificate. Please refer to section 9.5 for more details.
9.6 Generate Code Signing Certificate Request Form
This form allows users to generate a certificate signing request, or alternatively a self-signed certificate, that can be used to sign executable files and code packages.
This procedure is similar to generating a normal SSL certificate, but the requirements for generating a code signing certificate are different than those that apply to a normal SSL certificate.
To open this form you can use the Generate Code Signing Certificate menu item.
In this window you can enter all information required to generate a code signing certificate and then choose whether this certificate will be:
- signed by SSL.com‘s Certificate Authority, or
- self-signed by a user-controlled private key.
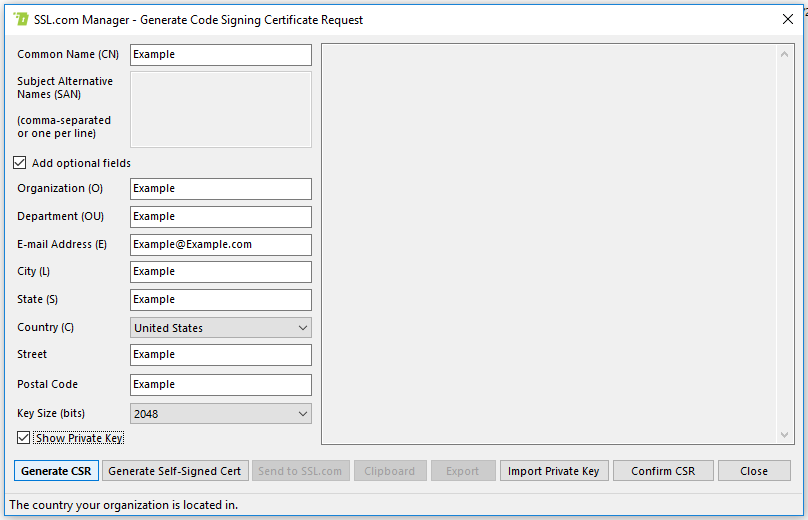
To create a self-signed certificate, click on “Generate self-signed”. Otherwise, to get a certificate signed by SSL.com‘s CA certificate, click on “Generate CSR”.
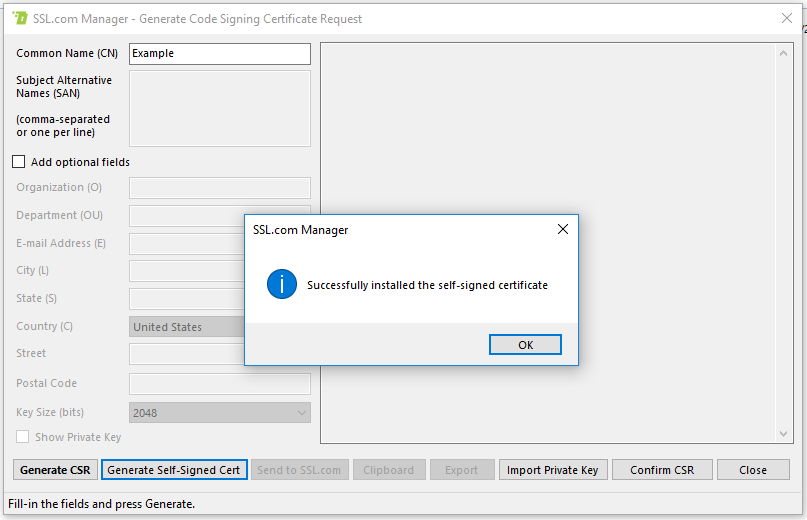
9.6.1 Generate a Self-Signed Certificate
Clicking on “Generate Self-Signed Cert” will generate the certificate and install it in the local OS trust store.
9.6.2 Generate CSR
Clicking on the “Generate CSR” button will create a new certificate signing request, and present it into the side pane of the window.
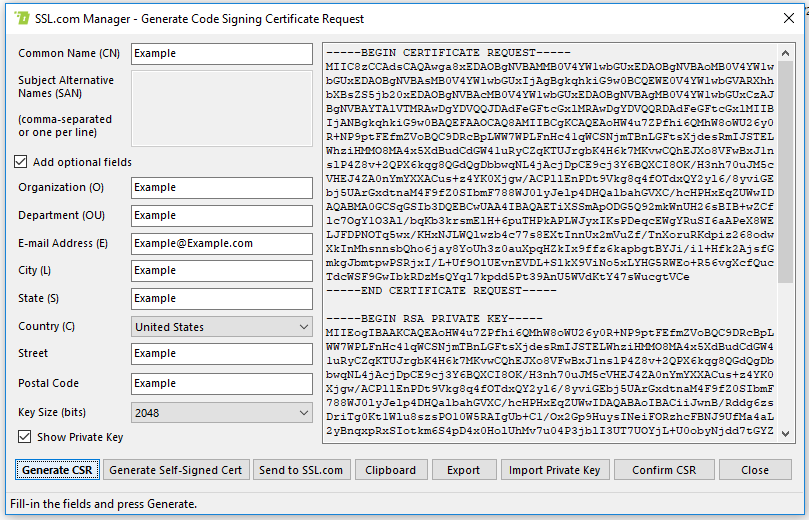
This CSR will also be shown in SSL Manager’s main display window, under “Pending Certificate Requests”.
This CSR is generated and stored locally. For SSL.com to sign your certificate, this request must be sent to SSL.com’s backend for verification and signing. You can either use the “Send to SSL.com” button in this form, or use the right-click context menu to do that.
You can find more information on how to submit a CSR here.
9.6.3 Import Private Key
This will import a private key to be used in the generation of a code signing certificate.
The process is identical with importing a private key to generate a normal SSL certificate, so please refer to section 9.3 for more details.
9.6.4 Confirm CSR
The “Confirm CSR” button will verify the integrity of the request, by checking its digital signature. If the CSR has been altered or corrupted, this signature check will produce an error and SSL Manager will throw a warning message. It is useful to verify your CSRs, because invalid requests are rejected by SSL.com’s backend.
Appendix: Troubleshooting Common Errors
This appendix lists some of the most commonly encountered errors that SSL Manager might display in an effort to explain their root causes, and provide easy ways to fix or avoid them.
A.1 The specified Private Key appears to be corrupt
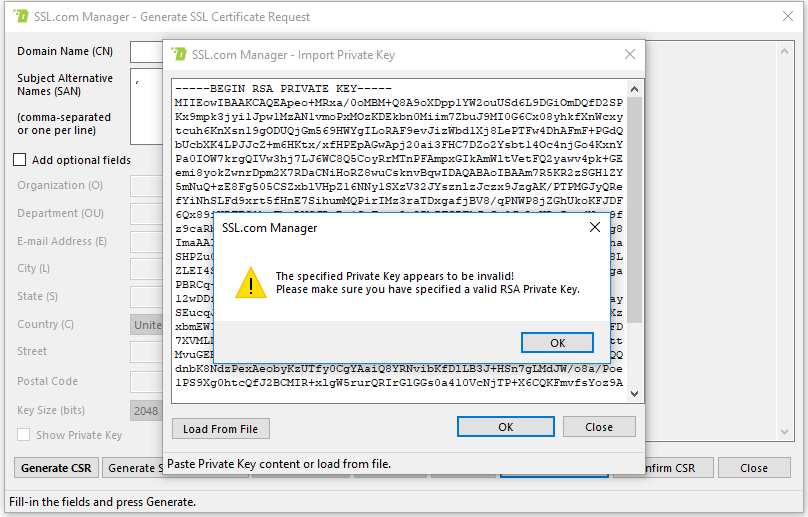
This error occurs when the user tries to import an invalid private key into SSL Manager. Private Keys are stored in a text-based (ascii) representation, called Base 64 encoding. If the key you have copied (or loaded as a file) is malformed, corrupted or invalid, the parser will complain with this error message.
If you are pasting the key from the clipboard, please make sure that you have copied all the characters in the key text. Including the equal signs (=) –if any– at the end.
A.2 Admin approval required error during customer login
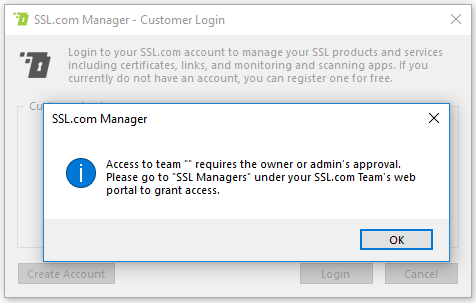
Every new instance of SSL Manager must be verified by the admin of your SSL.com team account. Although this seems inconvenient, it prevents someone from using an instance of SSL manager (and billing your account) without your direct authorization. To approve a new installation of SSL Manager, please follow the steps in this how-to.
After approval, you can use your instance normally. If this error persists, please feel free to contact us at support@stg.ssl.com.
A.3 Already Submitted CSR Error
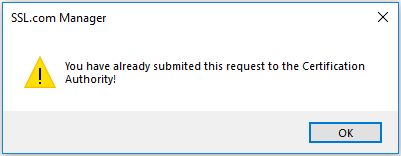
This error occurs when you try to submit a certificate signing request, that SSL Manager has already submitted to SSL.com’s backend.
To make sure that this is the case, you can see the status of the request in the main display window, under the “Pending Certificate Requests” section. Otherwise it should be listed in Orders & Vouchers.