Adobe Acrobat Sign enables the user to send PDFs and request digital signatures of other users. Follow these steps to create a signing flow on Adobe Acrobat Sign for organizations who want to request either internal members or external contacts to apply digital signatures to an electronic document like a PDF.
There are two requirements to this guide:
- An SSL.com document signing certificate that has been enrolled to eSigner. Here is the guide on how to do it: Enroll with eSigner for Remote Document Signing.
- An active account on Adobe Acrobat Sign.
SSL.com’s Document Signing Certificates are trusted worldwide to digitally sign and certify Adobe PDF documents with secure digital signatures. Additionally, our document signing certificates can be enrolled into our eSigner cloud signing service which allows our users to add globally trusted digital signatures and timestamps to their documents from anywhere, with no need for USB tokens, HSMs, or other special hardware.
Steps for Adobe Acrobat Sign Admin
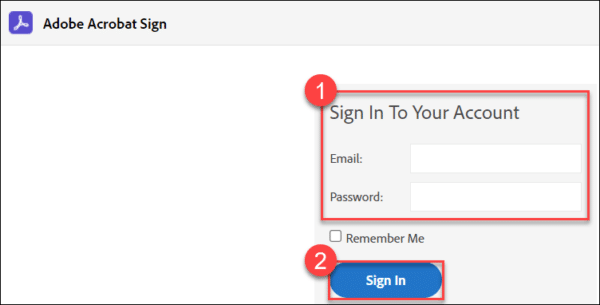
- Login to Adobe Acrobat Sign.
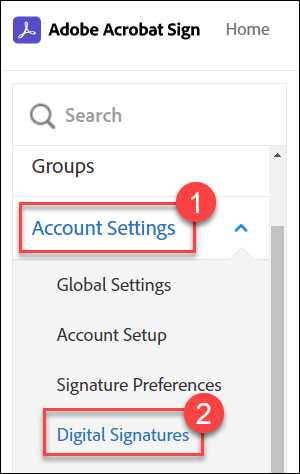
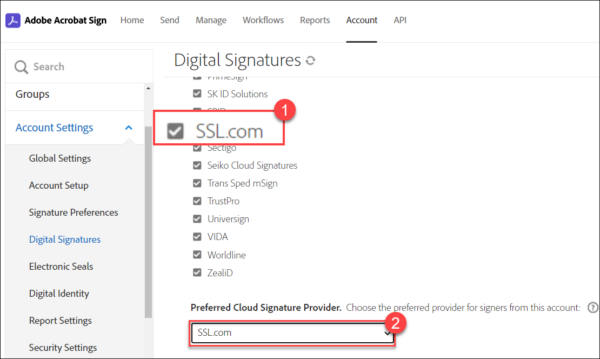
- Click the Account tab on the top menu

- Click Account Settings on the left bar, followed by Digital Signatures.
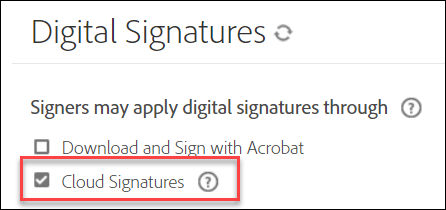
- Tick the box for Cloud Signatures. Adobe will present a list of Cloud Signature Providers that are trusted by default, including SSL.com. Double-check that the box for SSL.com has a check mark and then scroll down the page to the subsection named Preferred Cloud Signature Provider. Click the drop-down arrow and select SSL.com.


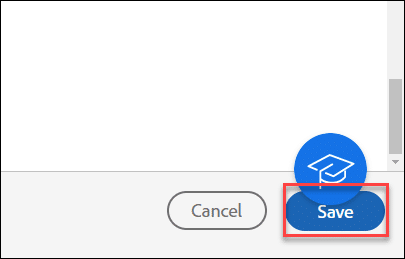
- Scroll down to the bottom of the page and click the Save button.

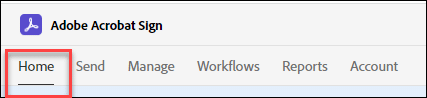
- Login to your Adobe Acrobat Sign account and click the Home tab on the main menu.

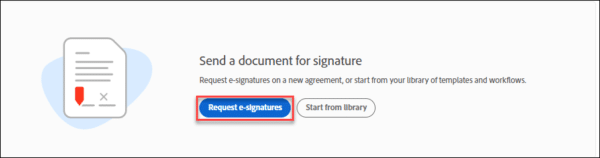
- Click the Request e-signatures button.

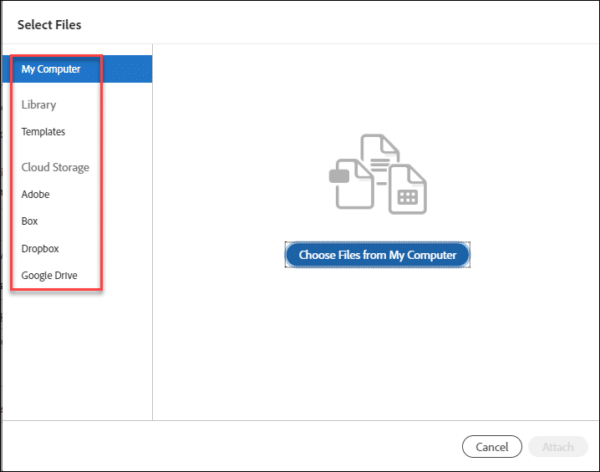
- Click the Add files link to upload the electronic document that you want to be signed by multiple recipients.

- Select the location of your file and upload or attach it to the signing page.

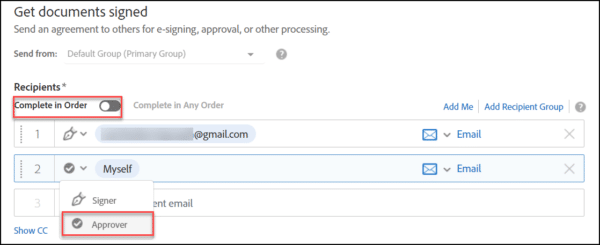
- Place the email addresses of all signatories. You can place your own email if you are a signatory. For each party, you can assign the role of a signer or an approver. Both roles will be able to apply digital signatures to the document but the approver/s will have the power of finalizing the signing agreement. You can choose to have the signing flow be in order according to the numerical position of the party in the list. You can also drag and drop each email recipient to configure their signing position.

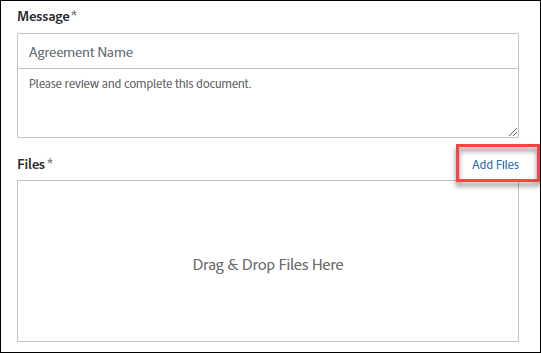
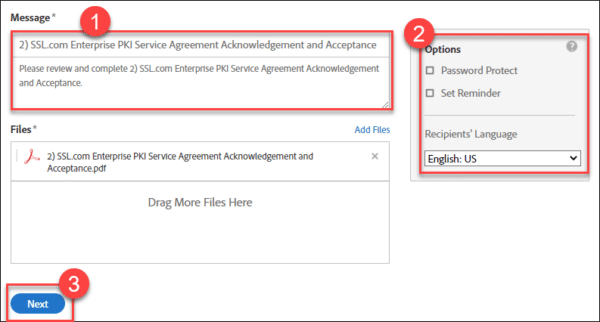
- Place the final name of the signing agreement and any additional message you may have for the recipients. You also have the option to select Password Protect to require recipients for a password to be able to open the signed PDF file. The Set Reminder option sets the frequency of reminders until the signing agreement has been completed. The Recipients’ Language option selects the language to be used in emails sent to recipients and during the signing process. Once the settings for the file and recipients have been finalized, proceed to click the Next button.

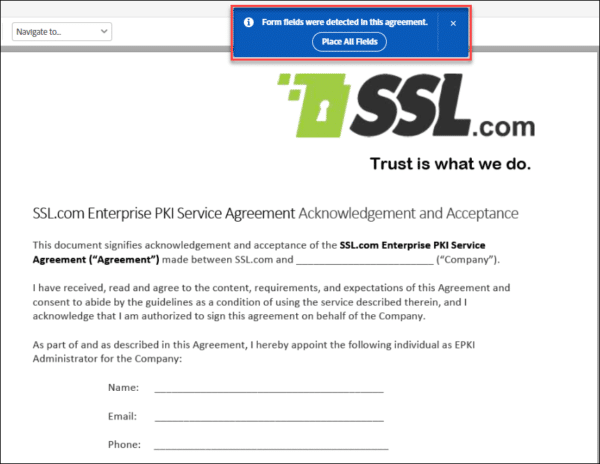
- After a brief processing time, Adobe Acrobat Sign will take you to the signing page. If there are form fields in your document like Name, Email, or Phone Number, you will be asked if you want to place all fields as part of the signing agreement. Otherwise, you can click the X button.

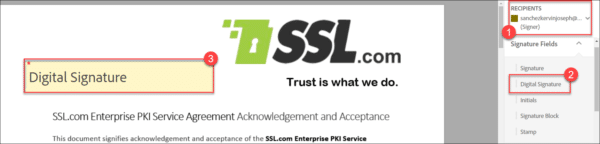
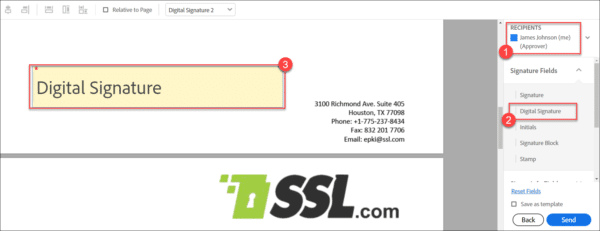
- Under the RECIPIENTS section, you will be able to choose each recipient in the signing agreement. On the Signature Fields section, you can configure the Digital Signature field of each recipient on the document. Click the Digital Signature option and drag it to the preview of the document. You can increase or decrease the size of the digital signature field by clicking the lower-right edge of the box and moving your mouse.

- If the recipients need to sign on different pages of the document, use the scroll bar to navigate to the desired position. Repeat the same process of configuring the digital signature box described in the previous step.

- You can also switch the role of a recipient assigned to a Digital Signature box by right-clicking the box, choosing the Edit option, and configuring the Assigned To drop-down field.

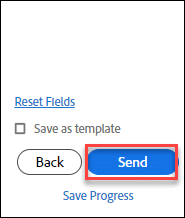
- Once all digital signature fields for all recipients have been finalized, click Send.

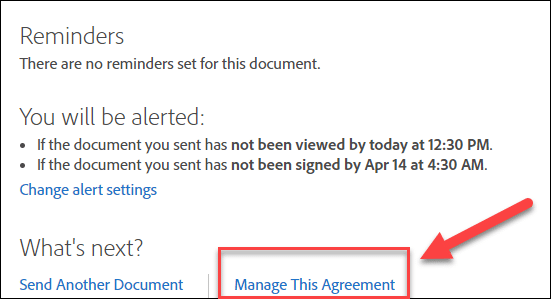
- After a brief processing period, Adobe Acrobat Sign will notify you that the signing agreement has been sent out to the recipients. You can click the Manage this Agreement link to track.

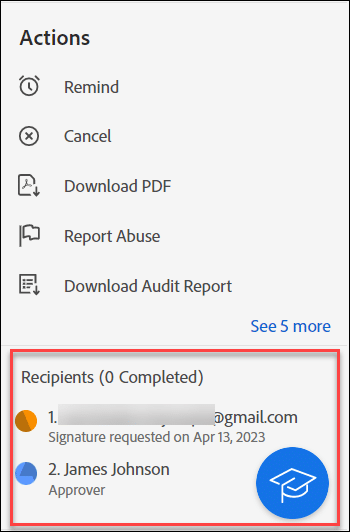
- Clicking the Manage this Agreement link will take you to the signing flow board and enable you to track the agreement and perform various actions. Under the Actions section, you can choose to remind a recipient for the requested signature or cancel the signing agreement. On the Recipients section, you will have a quick view of all signers and approvers and the status of the request sent to each. Those who have fulfilled the request will be marked with a green check mark.


Steps for Recipients
Note: A recipient of the signature request does not need to have an Adobe Acrobat Sign account but the person needs to have an active document signing certificate from SSL.com or other digital certificate providers to be able to fulfill the request for a digital signature. This demonstration shows an eSigner-enrolled document signing certificate from SSL.com.
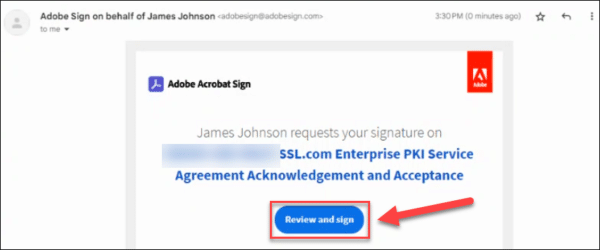
- In this demonstration, the signing flow is set in a required order. The first recipient receives the signing request by email and once it is accomplished, it moves on to the next one until the signing agreement has been completed by all parties. The signatory will click the Review and sign button to apply the digital signature on the document.

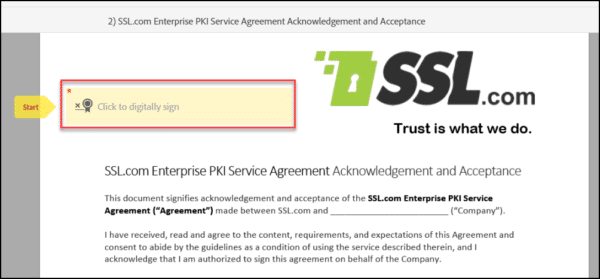
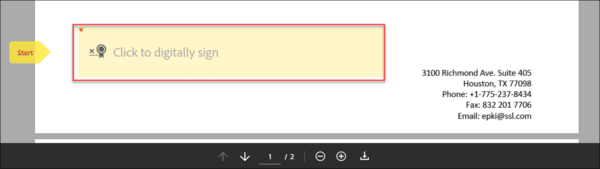
- Upon clicking the Review and sign button, the recipient will be directed to the signing page. The digital signature field marked by the words Start and Click to digitally sign should then be clicked.

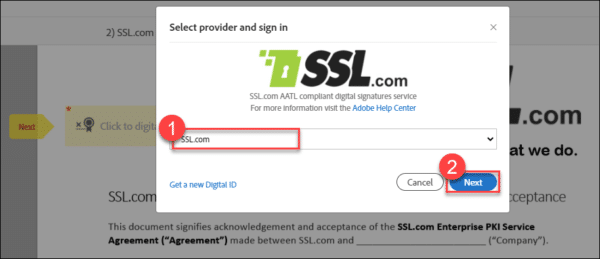
- A pop-up screen will show providing options for digital signature providers. Select SSL.com from the drop-down list and click the Next button.

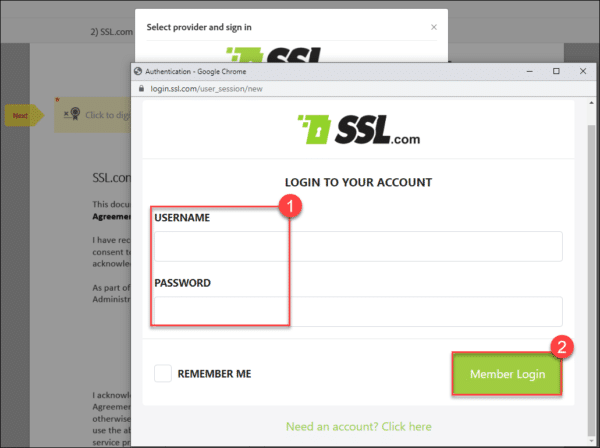
- Another pop-up screen will appear asking for your login credentials to your SSL.com account. Place your login details and click the Member login button.

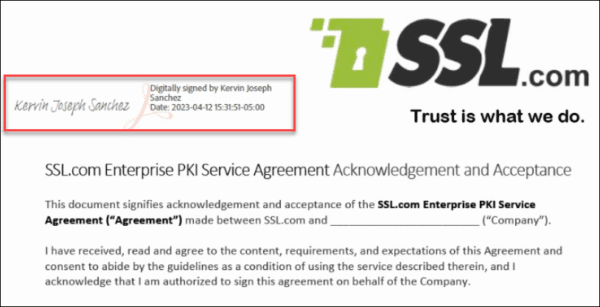
- A preview of the recipient’s digital signature will then appear on screen. Proceed to click the Click to Sign button located at the bottom of the signing page.


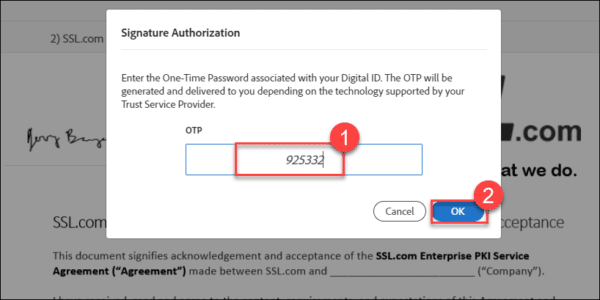
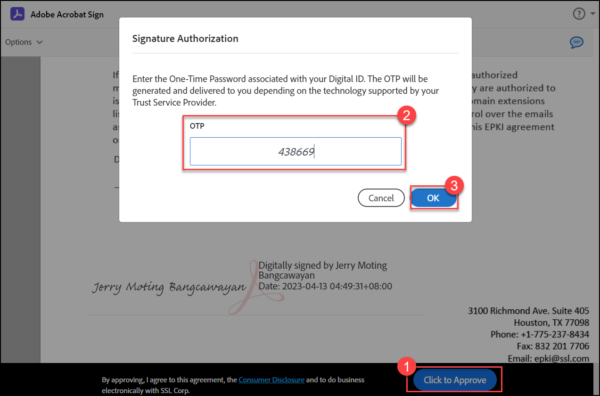
- A Signature Authorization dialog box will appear asking for the One Time Password (OTP) connected to the recipient’s chosen eSigner two-factor authentication method for signing. In this demo, the OTP comes from an Authenticator mobile app. After placing the OTP, the OK button should be clicked.

- After a brief period, Adobe will notify the recipient that the signing has been successful.

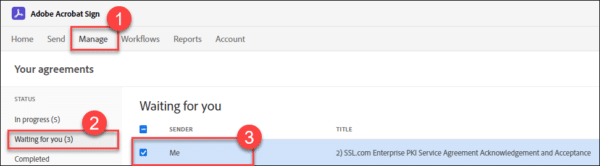
- The next recipient in the required signing flow order will then receive Adobe’s email requesting for the digital signature and will also perform the steps described above. After all signers have fulfilled the request, Adobe will send the approval request to the approver/s in order to complete the signing agreement. Approval will be performed on Adobe Acrobat Sign. The approver will click the Manage tab on the menu, followed by the Waiting for you section and the check box for the document being signed.

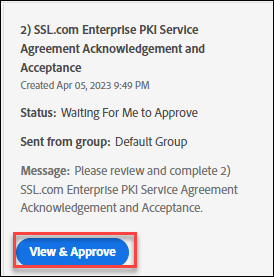
- The approver will then click the View & Approve button.

- The approver will be directed to Adobe’s signing page where the digital signatures of the other recipients can be seen. After reviewing these, the approver will click the signature field allotted for him/her.

- The approver will then go through the same process as the other recipients. Once the preview of the approval digital signature shows up, the approver will click the Click to Approve button, place the login credentials for the SSL.com account, and enter the eSigner One Time Password from the two-factor authentication method.

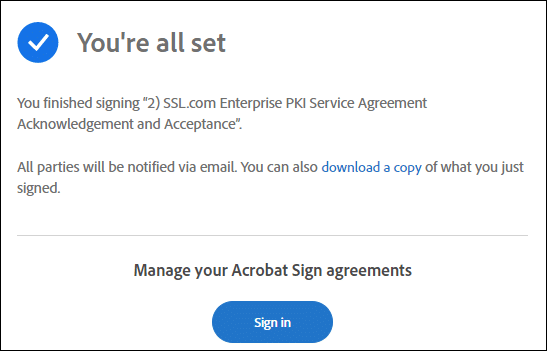
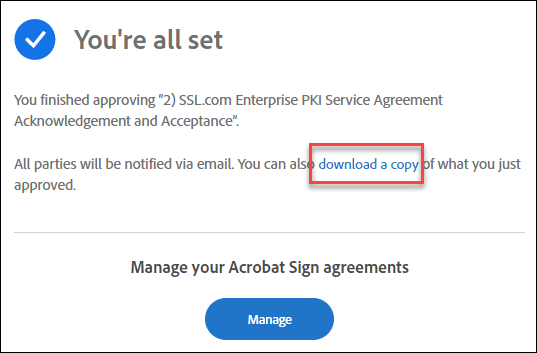
- After a brief processing time, Adobe Acrobat Sign will provide notice of approval that the signing agreement is completed. A copy of the signed file can be downloaded to view the digital signatures of each party.

- View the signature on your downloaded file.
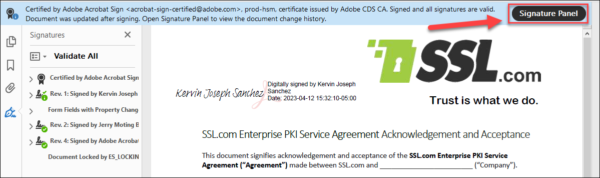
In this demo, we are using Adobe Acrobat Pro to view the document. Upon opening the doc, you will see the digital signatures of all recipients in the signing agreement. You will also see the message “Certified by Adobe Acrobat Sign. Signed and all signatures are valid.” Click the Signature Panel button to view the details of the digital signatures.

- Click the arrow beside your name to confirm that your signature is enabled for Long-Term Validation (LTV). Digital signatures produced from eSigner are PDF Advanced Electronic Signatures (PadES) compliant. This means that even if the SSL.com document signing certificate has long since expired, the digital signature can still be determined to be valid during the time of signing through a feature called Long-Term Validation (LTV).

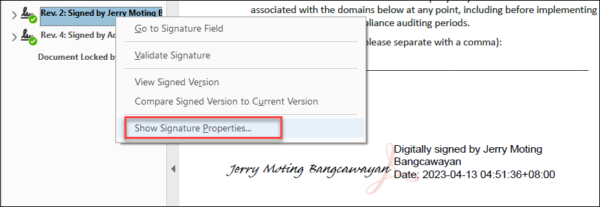
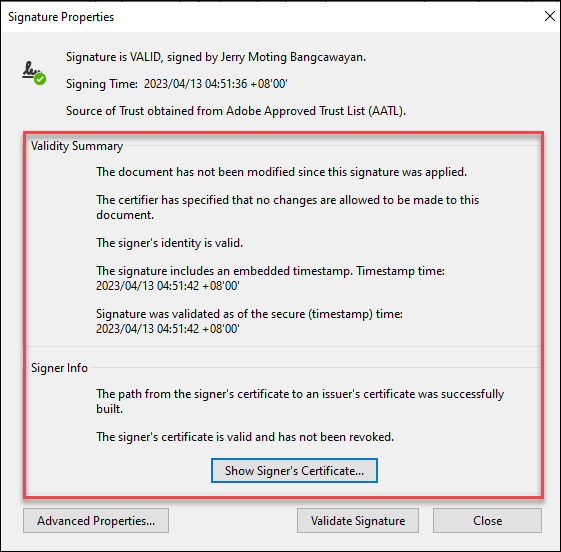
- Right click the signature showing your name and then left click the option for Show Signature Properties…

- On Signature Properties, you will be able to see that Adobe Reader recognizes all the security features acquired from the signing process:
- The document has not been modified since this signature was applied.
- The signer’s identity is valid.
- The signature includes an embedded timestamp.
- Signature was validated as of the secure (timestamp) time.


SSL.com’s Document Signing Certificates are trusted worldwide to digitally sign and certify Adobe PDF documents with secure digital signatures. Additionally, our document signing certificates can be enrolled into our eSigner cloud signing service which allows our users to add globally trusted digital signatures and timestamps to their documents from anywhere, with no need for USB tokens, HSMs, or other special hardware.
Thank you for choosing SSL.com! If you have any questions, please contact us by email at Support@SSL.com, call 1-877-SSL-SECURE, or just click the chat link at the bottom right of this page. You can also find answers to many common support questions in our knowledgebase.