
For the convenience of users and developers, SSL.com maintains a Sandbox testing instance, a clone of our production release of the SSL.com portal and SWS API. The Sandbox is like a “lab,” where you can freely experiment with SSL.com’s services with no fear of breaking anything important or accidentally spending real money. Testing in the Sandbox is especially important when developing automation solutions with SSL.com’s RESTful SWS API. Orders and transactions in the Sandbox are not live, and by extension not billable.
This guide will get you started with setting up a Sandbox account, creating a test order in the online portal, using the Sandbox with SSL.com’s SWS API, and linking an instance of SSL Manager to the Sandbox.
Getting Started
Setting Up a Sandbox Account
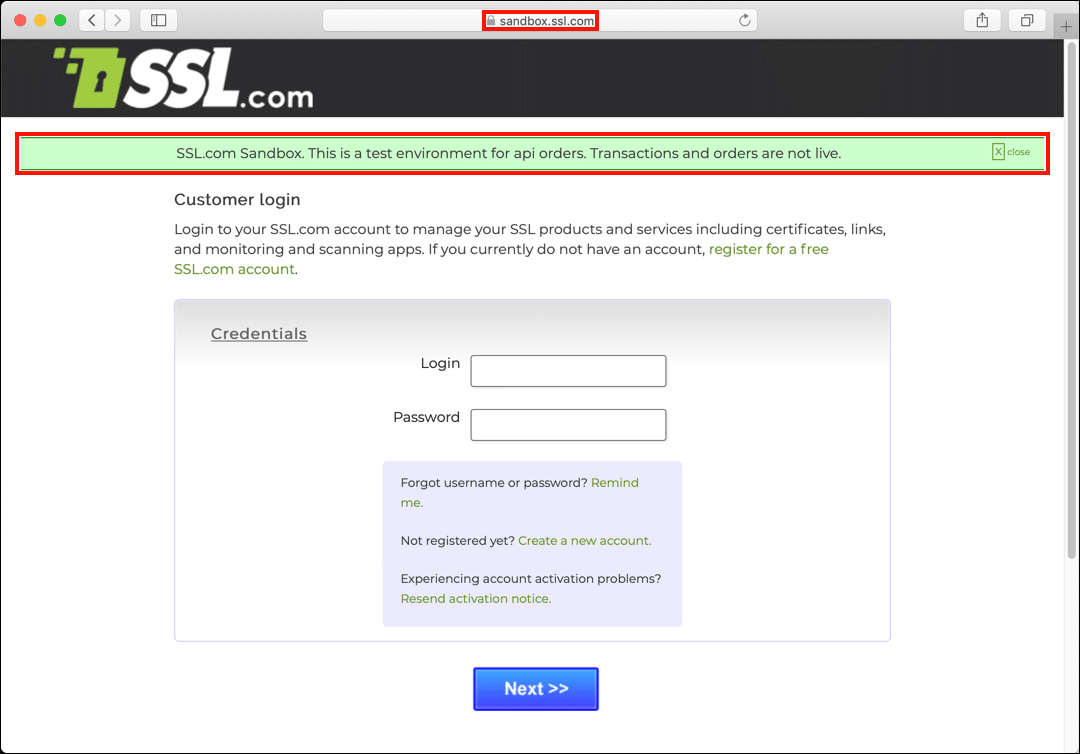
- Before you can start using the Sandbox, you’ll need to create a Sandbox account. This is true even if you already have an SSL.com customer or reseller account. To get started, navigate to https://sandbox.ssl.com/login. You can confirm you are logging into the Sandbox by looking for a green alert banner near the top of the window reading “SSL.com Sandbox. This is a test environment for api orders. Transactions and orders are not live.”
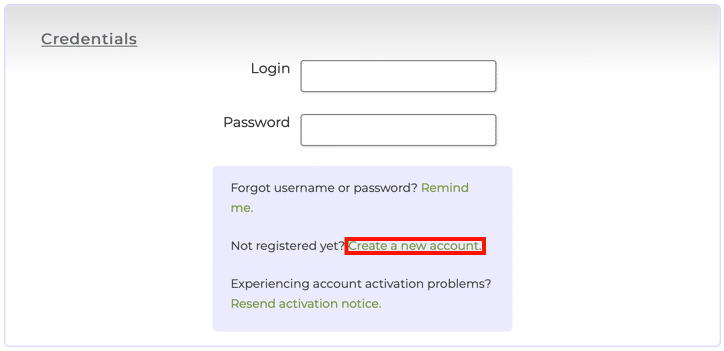
- Click Create a new account.
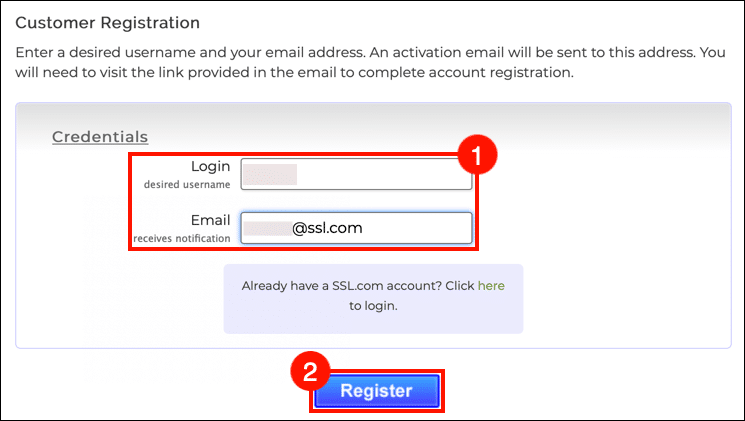
- Enter your desired username and email address, then click the Register button.
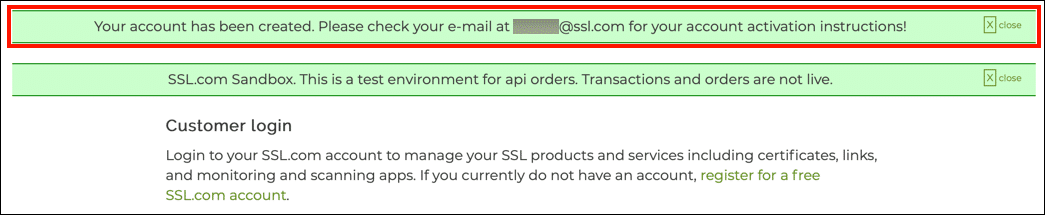
- You will now be returned to the login page. You should see a new green alert banner saying that the account has been created.
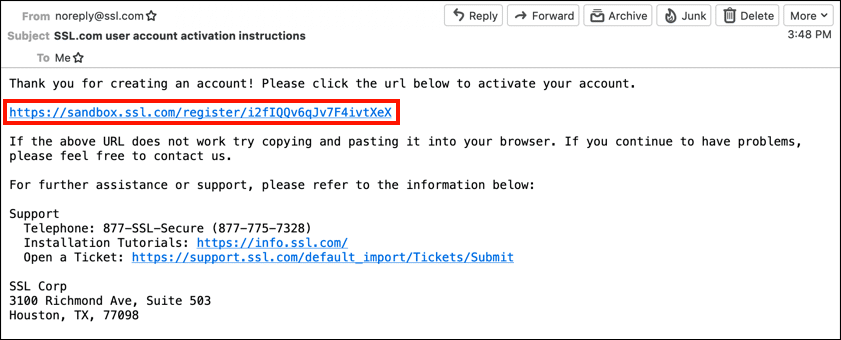
- Open your email client and look for a new message, titled “SSL.com user account activation instructions.” Open the message and click the activation link.
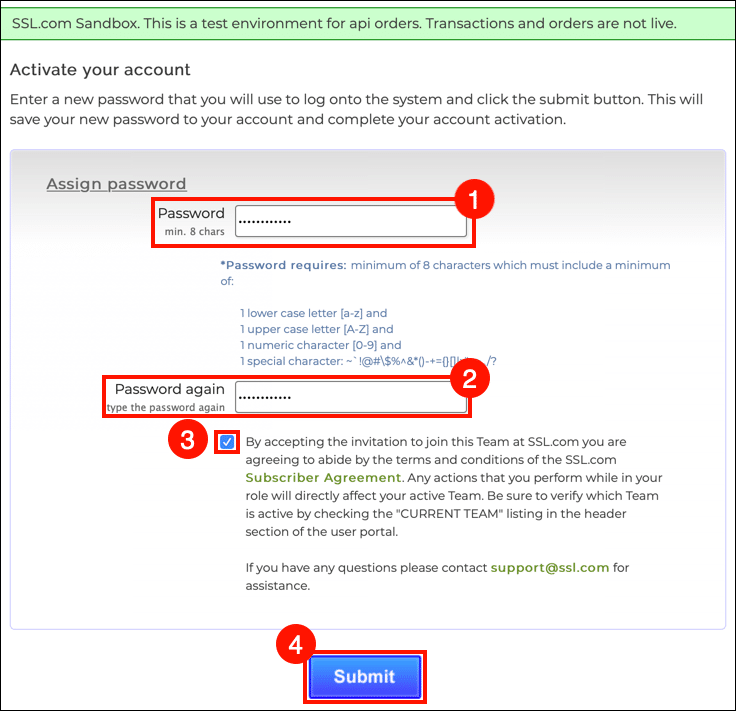
- On the page that opens, create a new, secure password, enter it again for verification, click the subscriber agreement checkbox, and click the Submit button. Your password must be at least 8 characters long, and must contain at least one lowercase letter, one uppercase letter, one numeric character, and one special character.
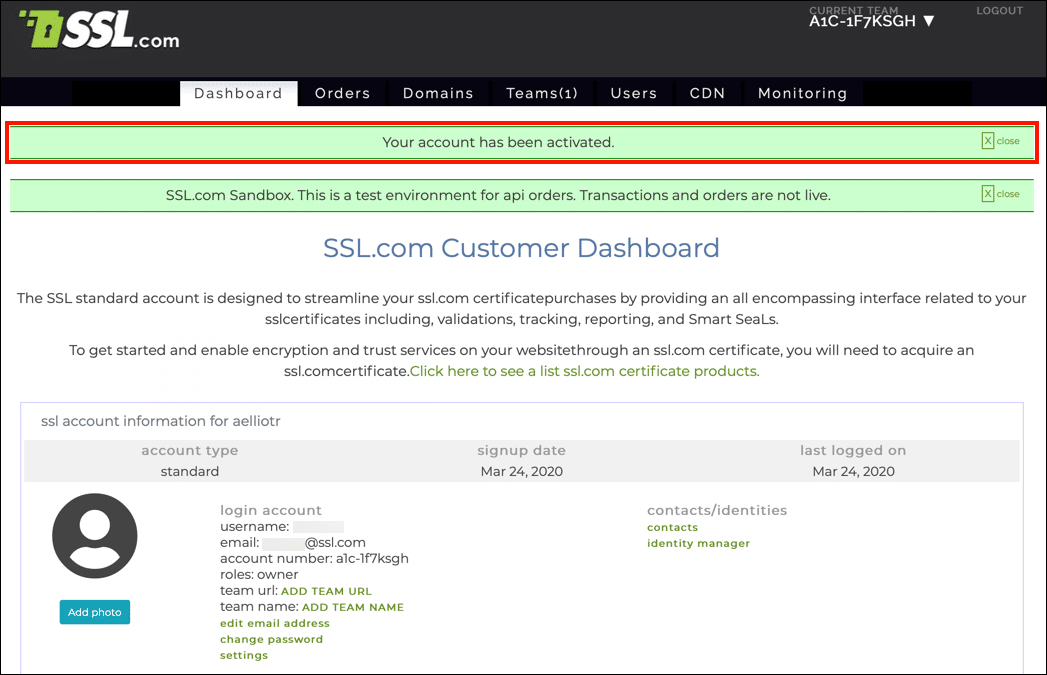
- After clicking Submit, you will be logged into your new Sandbox account. You should see a green alert box indicating that your account has been activated.
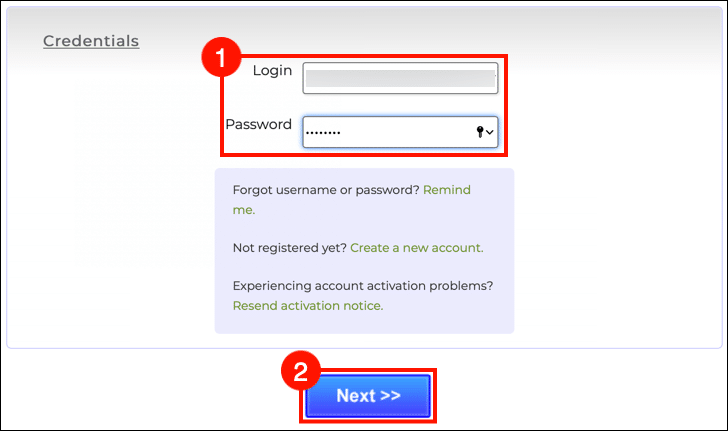
- You can login to the Sandbox by navigating to https://sandbox.ssl.com/login and entering the credentials you created above.
- You can now work with the Sandbox in a web browser just like you would in SSL.com’s user portal, with the major difference being that orders in the Sandbox are not live and do not involve real money and certificates. The Sandbox is therefore a great way to experiment with the portal’s functionality with no risk. Please refer to our user portal documentation when working with the Sandbox in a web browser.
Creating a Test Order in the Sandbox Portal
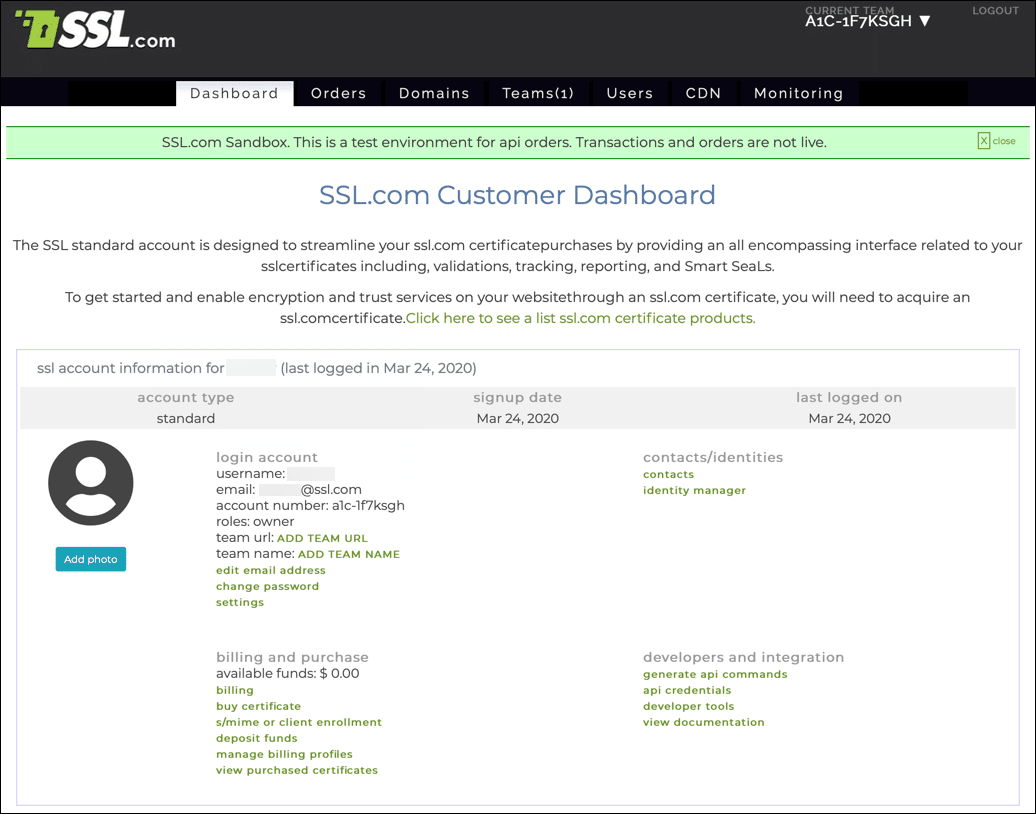
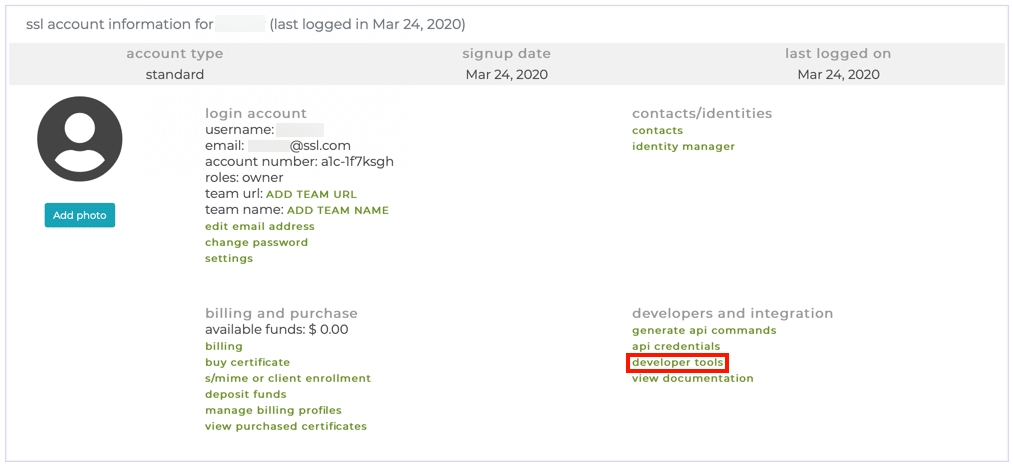
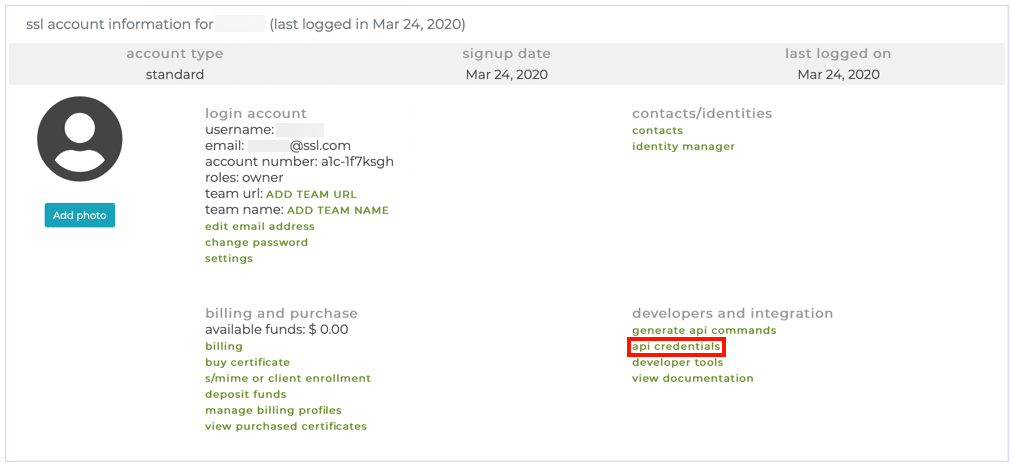
- Once your Sandbox account is set up, you can start making test orders. To get started making test orders in the portal, click the developer tools link, located under the developers and integration heading.
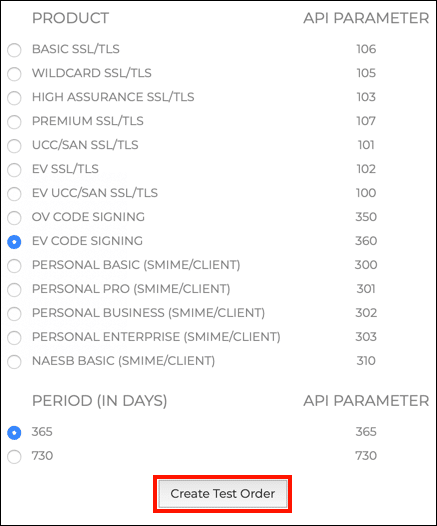
- The Developer Tools window will open. Start by selecting the type of certificate you want to order from the Product radio buttons, located under the Form Submit Method heading. In this case we’re going to create an EV code signing order.
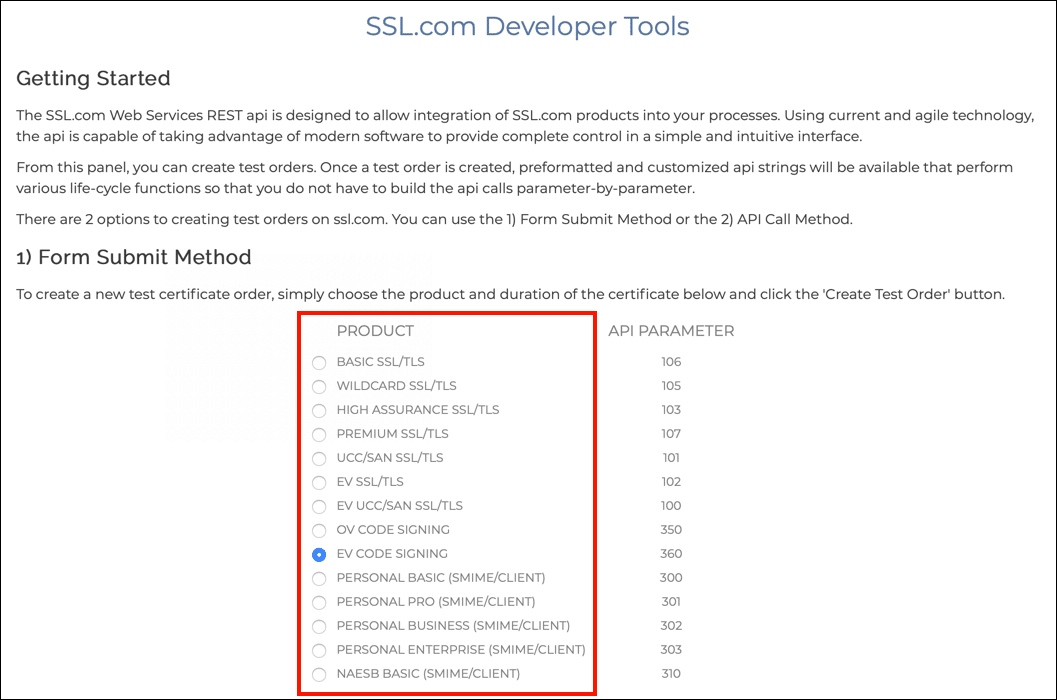
- Next, scroll down and select a time period (in days) for the order. Here’s we’re going with 365 days.
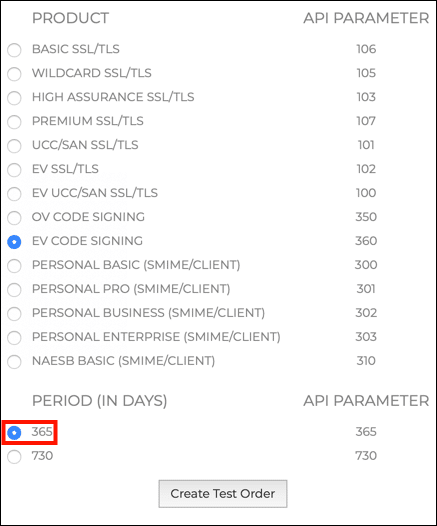
- When you’re finished selecting the product and time period, click the Create Test Order button.
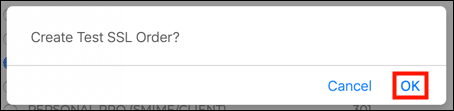
- A dialog box will appear. Click OK.
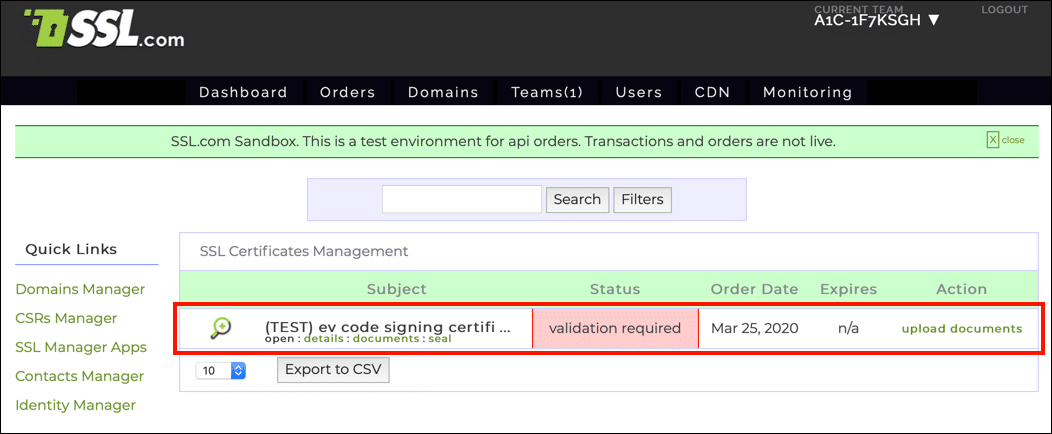
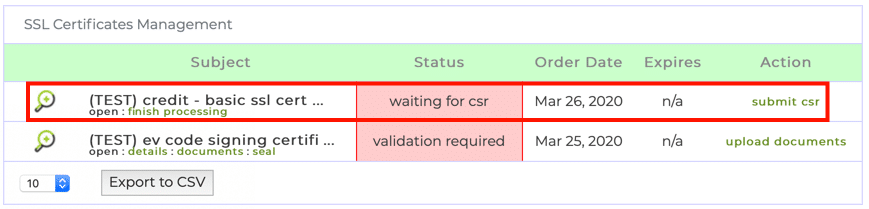
- Your test order will be created, and you will be returned to the list of orders in the portal. Note that the order is prefixed with “(TEST),” to indicate that it is a test order created in the Sandbox. You can continue to work with this order in the Sandbox just as if it was a real order. (For more information on working with orders in the portal, please check our guide.)
Using the Sandbox with SSL.com’s SWS API
SSL.com’s RESTful SWS API is a powerful tool for automation of certificate ordering and management. Using the Sandbox, you can thoroughly test your API calls and scripts in a safe environment before working with real certificates (and real money!).
The Basics
- To perform API calls to the Sandbox, you simply need to use this URL in your scripts:
https://sws-test.sslpki.com/
- When your automation is tested and ready, switch to the production API URL:
https://sws.sslpki.com/
Creating a Test Order with the API
- The online portal includes a template for an API command to create a certificate. To find it, first click the developer tools link on your dashboard:
- Next, scroll down to API Call Method.
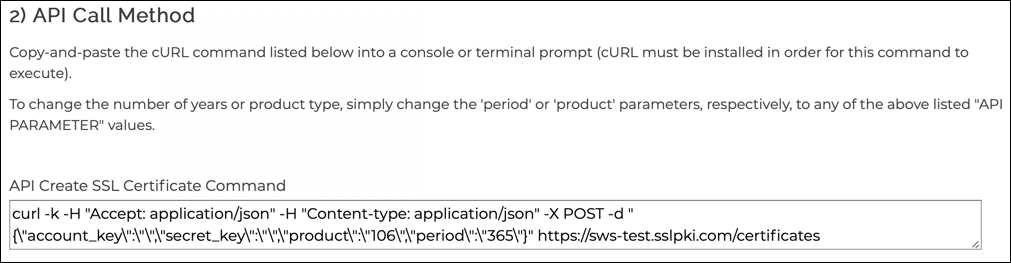
- Before you can use the command, you’ll need to add your own API credentials. Cut and paste the API Create SSL Certificate Command into a text editor:Note: Command and JSON examples have been formatted with line breaks for readability in this guide. A backslash character (
\) followed by a line break lets you break a long command into multiple lines in a Linux/UNIX terminal.curl -k -H "Accept: application/json" \ -H "Content-type: application/json" \ -X POST \ -d "{\"account_key\":\"\",\"secret_key\":\"\",\"product\":\"106\",\"period\":\"365\"}" \ https://sws-test.sslpki.com/certificates - To access your API credentials, return to the portal dashboard and click api credentials.
- To use the command you will need your account key and secret key. You can copy them to the clipboard by clicking the icons to the right of the keys. You can also select and copy these values directly, but for the secret key you must click on Click to view first.

- Add your account key and secret key to the command as shown below:
curl -k -H "Accept: application/json" -H "Content-type: application/json" \ -X POST -d "{\"account_key\":\"a506819b81d6\",\"secret_key\":\"WkTRJzr19I7OUg==\",\"product\":\"106\",\"period\":\"365\"}" \ https://sws-test.sslpki.com/certificates - You can now paste the command into a terminal and run it. The command will return a JSON object describing the order.
{ "ref":"co-991f7pdt0", "registrant":{ "organization":null, "organization_unit":null, "street_address_1":null, "street_address_2":null, "street_address_3":null, "locality":null, "state_or_province":null, "post_office_box":null, "postal_code":null, "country":null, "email":null }, "order_status":"unused. waiting on certificate signing request (csr)", "validations":null, "order_amount":"$49.00", "external_order_number":null, "certificate_url":"https://sandbox.ssl.com/team/a1c-1f7ksgh/certificate_orders/co-991f7pdt0", "receipt_url":"https://sandbox.ssl.com/team/a1c-1f7ksgh/orders/cfb1-1f7pdt1", "smart_seal_url":"https://sandbox.ssl.com/team/a1c-1f7ksgh/certificate_orders/co-991f7pdt0/site_seal", "validation_url":"https://sandbox.ssl.com/team/a1c-1f7ksgh/certificate_orders/co-991f7pdt0/validation", "certificates":null, "certificate_contents":{ "ref":"co-991f7pdt0-0" } } - Return to the Orders tab in the Sandbox portal to view the new test order.
- You can change the type of certificate you’re ordering by changing the product number in the command. Product numbers are shown on the developer tools page:
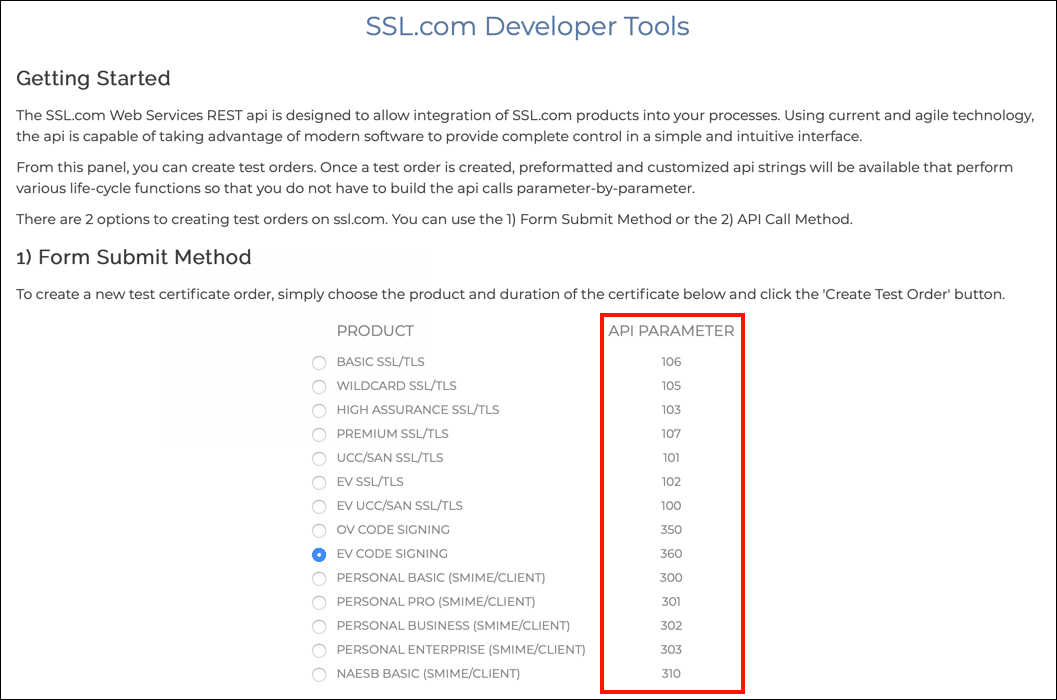
- For example, if we want to order an EV code signing certificate instead of a basic SSL/TLS certificate, we can simply change
\"product\":\"106\"to\"product\":\"360\"in our API command. - We can also choose a longer duration by changing
\"period\":\"365\"to\"period\":\"730\". So, a command for a 730-day EV code signing certificate would look like this (of course, in real life you would include your ownaccount_keyandsecret_key.):curl -k -H "Accept: application/json" \ -H "Content-type: application/json" \ -X POST \ -d "{\"account_key\":\"a506819b81d6\",\"secret_key\":\"WkTRJzr19I7OUg==\",\"product\":\"360\",\"period\":\"730\"}" https://sws-test.sslpki.com/certificates
The Next Steps
There’s a whole lot more that you can do with the SWS API in the Sandbox. Our introductory guide to the API covers certificate orders in much more detail. You can also retrieve pregenerated API calls for a variety of purposes from your Sandbox account portal. SSL.com’s API documentation is available here.
Using the Sandbox with SSL Manager
If you are using SSL Manager, SSL.com’s Windows application for digital certificate ordering and management, it’s easy to set it up to use the Sandbox.
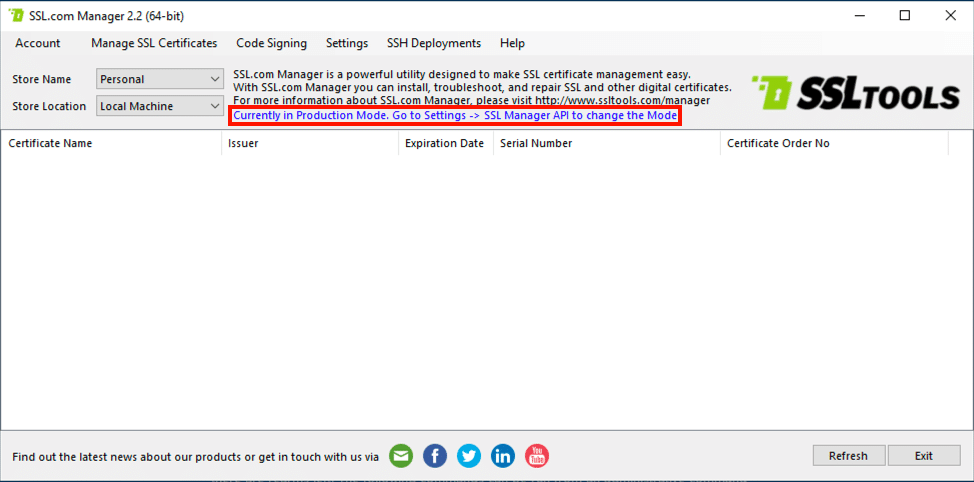
- SSL Manager’s main window will display if the software is in production or test mode. The screenshot below shows a newly-installed instance in production mode:
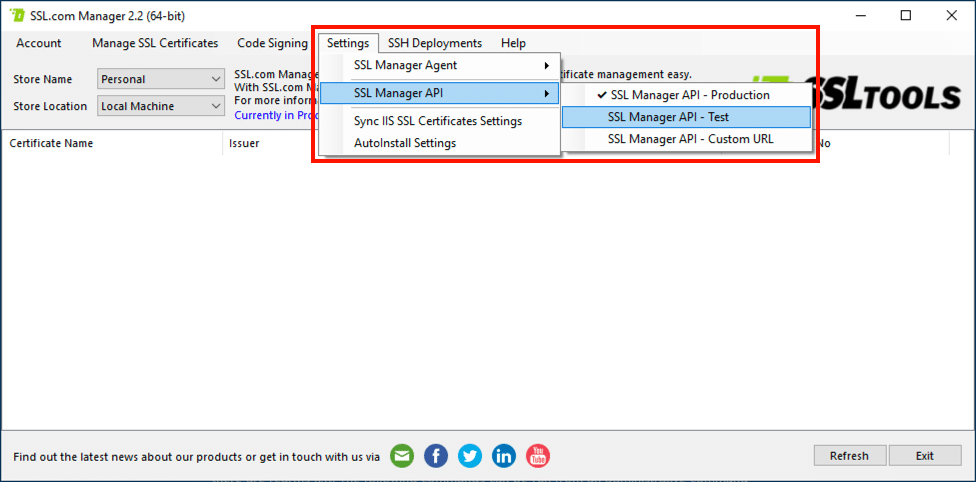
- Switch to test mode by navigating to Settings > SSL Manager API > SSL Manager API – Test in the menu.
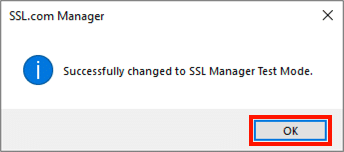
- Click the OK button to close the dialog box.
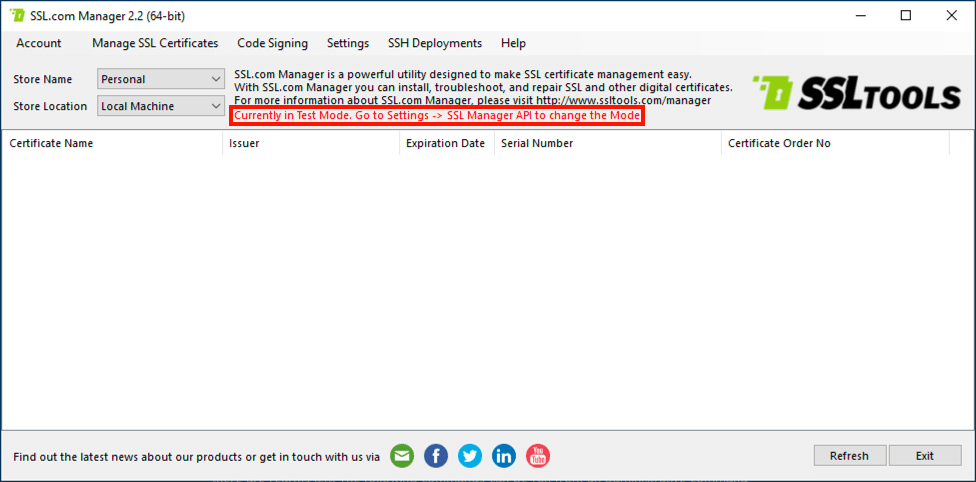
- SSL Manager is now in test mode and will use the Sandbox rather than the production API.
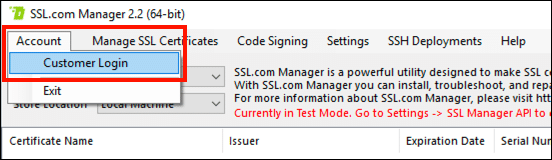
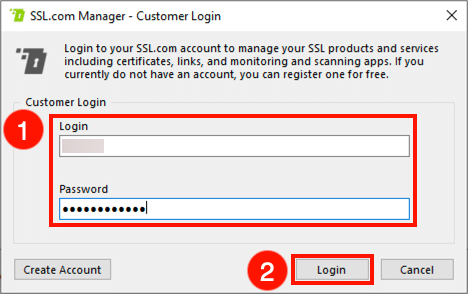
- Login to your Sandbox account by selecting Account > Customer Login from the menu.
- Enter your Sandbox Login and Password, then click the Login button.
- A dialog box will appear directing you to grant access to the account in the web portal. First, click the OK button to dismiss the dialog box.

- Next, login to the Sandbox in a web browser. If you have set up multiple teams in the Sandbox, make sure that the team you want to use is set at the Current Team.

- Navigate to the Orders tab, then click the SSL Manager Apps link.

- Locate the instance of SSL Manager in the list and click the Pending link.

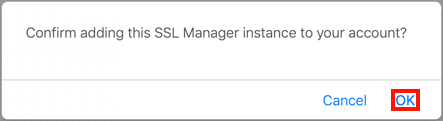
- Click OK to confirm that you want to add the SSL Manager instance to your account.
- The status of the SSL Manager instance will now be shown as Active, and you can now use the application to create test orders in the Sandbox. For full details on working with orders and certificates in SSL Manager, please refer to our documentation.
