
This document, part of our portal documentation, describes the features implemented in the Users page of your SSL.com customer account portal. The Users page allows you invite users to your SSL.com Teams, and manage their access permissions by assigning them roles.
You can use the following Table of Contents to jump to a specific topic:
Introduction to Teams and Roles
A Team is a logical grouping of users, orders, transactions, validations, and site seals, which makes managing your organization’s assets easier. A Team can have multiple users, each assigned several roles, although it has only one Owner. The Owner can invite new users, and manage everyone’s access, as they see fit. When you first create your SSL.com account, login, and click the Users tab, you should only see your own user, having the role of owner.
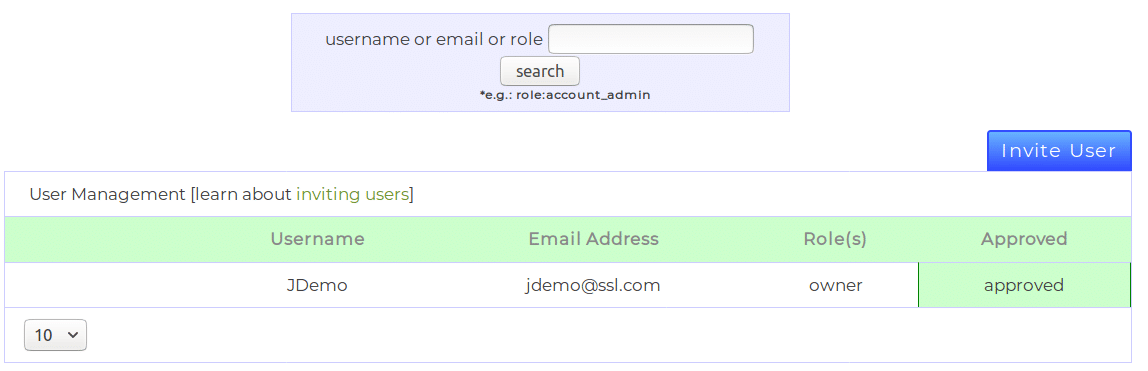
If you have already invited multiple users into your Team, and have trouble finding a user you want to manage, you can either use the drop-down list at the bottom-left corner of the Users page to increase the number of entries shown in the list, or search via the search form above.
You can always search for a specific role, using the role: specifier, or search for partial usernames or email addresses. The available roles you may search for are shown in the following list:
account_adminallows users with this role to manage every detail in the account, much like being an owner.billingallows users to manage invoices and billing information for the Team.individual_certificateprovides access to a single certificate order. The user cannot access anything else on the Team.installerallows users to create certificate orders, perform validation, and download issued certificates, though they cannot access anything else on the Team.users_managerallows users to manage other users’ access.validationsallows users to manage the Team’s pending validations.
Invite New Users
To invite a user to your Team, click the blue Invite User button, located above the user list. Clicking the button will redirect your browser to an invitation form, shown in the following image:
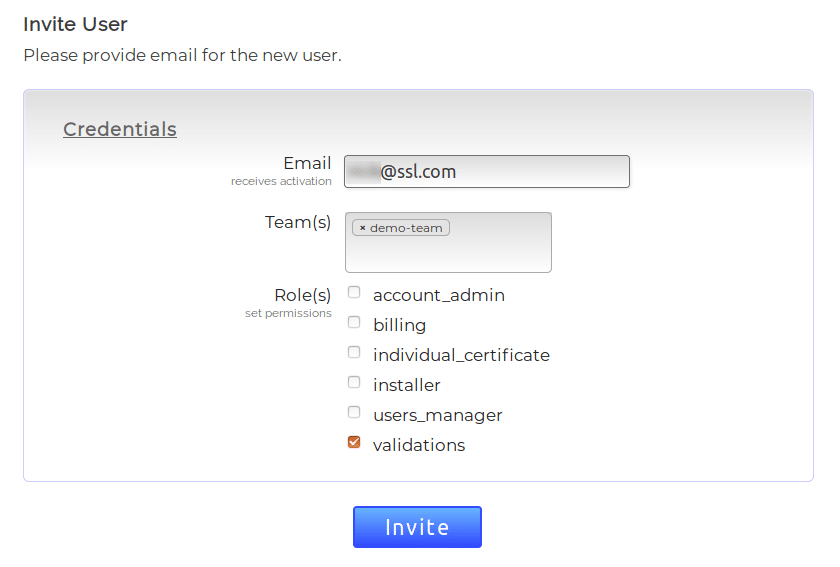
The form will ask you for basic information about the new user; you must specify the user’s email address, the Teams they will have access to, and finally the role (or roles) they will be assigned.
A single user can hold multiple roles at the same time, with their access level being the union of all their roles. After you’ve made sure that the information you’ve entered into the form is correct, click Invite to submit the invitation.
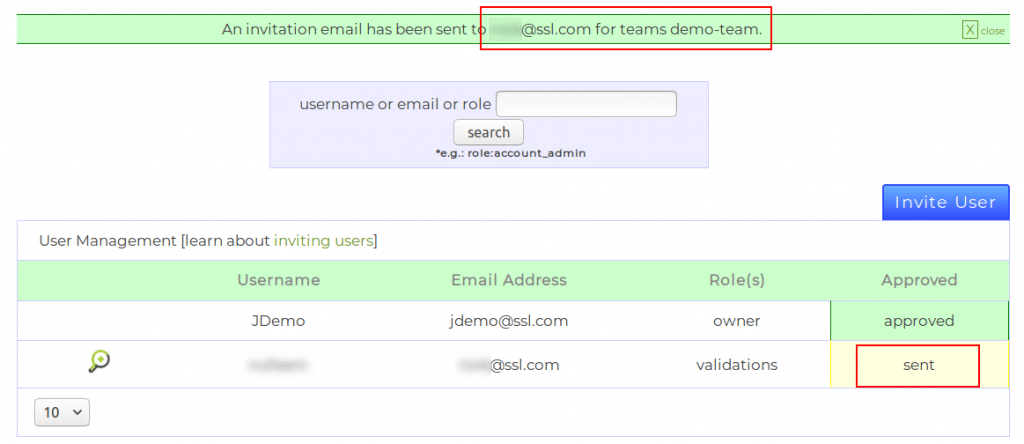
After clicking the button, you should see the new user with the status sent in its Approved column, and a banner informing you of the status of the operation.
The user will receive an email with an invitation link. After clicking the link and using their credentials to login to their SSL.com customer account, they will see a banner informing them of having accepted the invitation to a new Team. This banner also offers them the option to set the new Team as the default Team for ease of use.

After the invitation has been accepted, you should see the new user as being approved, and they should receive a confirmation email informing them that the invitation was accepted.
Expired Token
The invitation link lasts for 72 hours. If the invited user does not accept it within this time period, the invitation token will expire and a new email will have to be resent. The portal will automatically detect such events and change the status of the affected users to token expired. You can resend an invitation by clicking the magnifying glass button to open the manage account section, and click the resend invite link.

Remove a User from Your Team
If at any point you wish to remove a user from your Team, you can do so by opening the manage account menu. This can be done via clicking the magnifying glass icon in the left-most column of the users list, as highlighted in red in the following image:

To remove the user, click the remove user from this account link. The operation is instant, and the portal will also show a banner with the status.
Change User Roles
As we mentioned in a previous section, a user can be assigned various roles inside a Team. You, as the owner of the account (or a user with the user_manager role), can always change the assigned roles of any Team members. This can be achieved through the change roles link, in the manage account section. To open this section, locate the user you wish to modify in the list, and click on the magnifying glass icon.

Clicking the change roles link will redirect your browser to a form that will allow you to update the selected user’s roles.
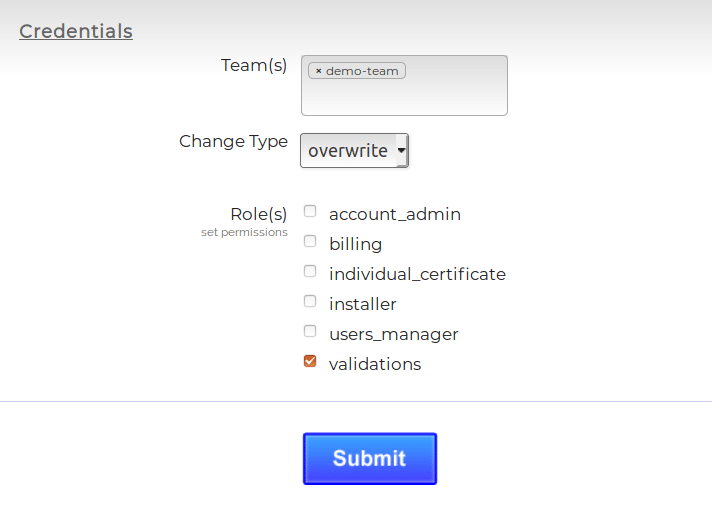
This form allows you to specify the Team you want to modify the roles for, as well as the roles themselves. The form provides three distinct actions for handling the new roles; these choices are available to you via the Change Type drop-down menu.
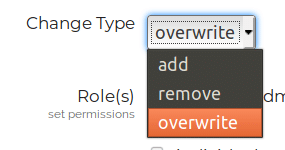
Each change type affects the way the portal will process the new roles. The default type is overwrite.
- add will append the assigned roles to the existing roles the user already holds.
- remove will strip all selected roles from the user.
- overwrite will completely flush the user’s previously assigned roles and replace them with the ones that you have selected.
To modify the roles, select the change type from the menu along with the new roles, and click the Submit button in order to finalize the changes. A banner should appear, informing you of the operation’s status.
Enable/Disable a User
There are cases where you might not want to entirely remove a user from a Team, but rather temporarily disable their access. A disabled user is not permitted to access any Team resources. Enabling and disabling a user can be done via the user enabled? section. To find this section, click the magnifying glass in the left-most column of the list.

To disable an already-enabled user, select the disabled radio button. Naturally, clicking the enabled button will re-enable a previously-disabled user. The changes will occur immediately, without the portal showing a banner, or you having to refresh or submit the page.
Enable/Disable Two-Factor Authentication
For the uninitiated user, two-factor authentication is a security practice that requires a user to authenticate themselves via (at least) two distinct methods. A common example would be logging in to your email account both using a password, and a one-time password (OTP) sent to your smartphone – the password being the first factor, and the OTP being the second.
The portal requires invited users by default, to authenticate via two factors. This is achieved using the Duo 2FA system. You can control whether a user is required to use two-factor authentication via the duo enabled? section.
